Help Center
Documentation
1. Introduction
out.bounz enables you to send, evaluate and optimise emails directly in Salesforce in a fully or semi-automated way, thus ensuring efficient, personalised and time-optimised email communication.
The following documentation provides you with detailed information about the app and describes all the installation and configuration steps required to use out.bounz successfully.
Do you have any questions or need help setting up the app? Just send us an email to support@outbounz.com and we will help you immediately.
1.1. Features
out.bounz offers you the following functionalities directly in your own Salesforce environment:
- Creation of flexible and customised email templates with dynamic integration of current CRM data.
- Customisable workflow for sending emails to all objects in Salesforce (incl. custom objects).
- Use of smart email automations to minimize time and manual effort.
- Easy creation of email campaigns and journeys for optimised customer communication.
- One-click translation of email messages with the integrated DeepL translator
- Monitoring of key figures such as open and click rates of your sent emails.
All functionalities can be fully automated (depending on preference). The out.bounz and Salesforce-native automation options interlock seamlessly.
This list provides an overview. We will describe these functions individually and in detail later on.
1.2. Interface of out.bounz
The interface for configuring and using out.bounz is made up exclusively of native Salesforce components. You will find the following tabs in the application:
| Tabs | Description |
|---|---|
| Home | On the home interface you will find up-to-date dashboards of your emals sent with out.bounz by mailboxes or triggers. It also sowhs activities and statistics about your systems mailboxes. |
| Configurations | With the help of a "Configuration" record created during the configuration, you control the basic settings and rules of the application. |
| Mailboxes | Here you create and manage your mailboxes to send emails from. |
| Templates | Here you create and manage your email templates. |
| Wrappers | Here you create and manage wrappers for your email templates and mailboxes. |
| Schedules | Here you can create and manage schedules for automated email sending. |
| Campaigns | Here you can create and manage campaigns for automated one-time email sending. |
| Notification Settings | This is where you set up push notifications for one or more Salesforce users. |
| Invalid Addresses | Here you can see invalid mail addresses. |
| Activities | Here you can see all activities, like email openings if you activate tracking. |
| Results | List of most actions performed in the application with respective result and information about occurred errors. |
Note: At least 10 out.bounz licences are required to use Schedules and Campaigns.
1.3. Requirements
In order to be able to install and use out.bounz, some prerequisites must be met in your Salesforce instance. You can find out what these requirements are below.
out.bounz initially requires the use of a Salesforce SalesCloud Enterprise Edition. Of course, higher editions of SalesCloud are also supported.
Sometimes emails that are not sent from your email application but from another server (in this case the Salesforce server) are flagged as spam if the server is not recognised as secure. SPF and DKIM should be configured for optimal email delivery.
SPF: _spf.salesforce.com should be added to the SPF in your email application. This way all Salesforce domains will be recognised.
DKIM: Search under "Setup" for "DKIM Keys" and select "Create New Key". Now select the key size and enter the selector, alternate selector, domain and domain match pattern (all these fields are also explained in the help texts in the Salesforce interface). The .txt files are published by Salesforce. Publish the CNAME and the alternative CNAME in your domain DNS. Once this is done and working, the DKIM key can be activated in the Salesforce setup.
If you want to send emails via SMTP, you should have your login details ready. You can find instructions on setting up mailboxes with SMTP settings in the "Mailboxes" chapter.
2. Installation and Configuration
A few preparatory steps are necessary to use out.bounz. These naturally include the installation of the tool itself, but also further configuration measures, which we describe in this section.
Note: We offer a free set-up service with the purchase of out.bounz! Simply send us an email to support@outbounz.com
2.1. Installation
The installation of out.bounz takes place via the Salesforce AppExchange.
Click on the "Get It Now" button to start the installation process.
When you are on the installation page, select "Administrators only". This selection is necessary as otherwise unauthorised users could gain access to sensitive data.
 X
X
Click on "Install" and confirm the message "Yes, allow access to these third-party websites".
Background: As part of the installation, authorization must be granted to access various interfaces. In addition to the interface, communication with the out.bounz servers must also be established for the smooth operation of the tool.
 X
X
 X
X
As soon as your installation is complete, you will find all the components associated with the package in your Org. You can recognise them by the namespace "out.bounz".
You may see a message that says: "The installation of this application will take some time. You will receive an email when the installation is complete. If this is the first time you have seen such a message, don't worry. Just click "Done". Salesforce will email you to let you know if the installation was successful.
 X
X
After completing the installation, we recommend checking the installation in the "Packages" section under "Installed packages" in the Salesforce setup.
 X
X
2.2. Granting rights of use
The use of the application requires the assignment of certain rights to the desired Salesforce users. A basic distinction is made here according to the type of use:
- out.bounz licences
- Salesforce Permission Sets
out.bounz licences are assigned directly to the out.bounz package listed there in the "Installed packages" area. To do this, click on the "Manage licences" button and assign the desired users.
 X
X
However, Salesforce permission sets are assigned separately. A basic distinction is made between the following types of Salesforce permission sets in out.bounz:
- out.bounz Admin: for full administrative access to all areas of the application
- out.bounz Manager: for the administration of templates, wrappers, campaigns and schedules
- out.bounz User: for user access
To assign these authorization sets, search for "Permission Sets" in the setup.
In the list, search for "out.bounz Admin", "out.bounz Manager" and "out.bounz User" and click on the respective set of rights that you would like to assign to a user.
 X
X
Go to "Manage assignments" and add the desired users by ticking the box.
 X
X
IMPORTANT: It is also essential to release the dashboards and reports supplied as standard with out.bounz. To do this, please switch to the standard tabs for "Reports" and "Dashboards" in the Salesforce interface and there (!) share the folder "out.bounz" added with the installation of out.bounz with the group of all internal users. This sharing option can be found as follows: Search via the search function Reports or Dashboards > All folders > out.bounz > Share (via the arrow function on the right). If this step is omitted, the home screen of the out.bounz app cannot be displayed correctly for users without an administrator licence.
2.3. Record Page Activation
As Salesforce unfortunately does not allow the activation of Record Pages when installing applications such as out.bounz if Record Types are used at the same time, this must be done manually once after installation. Activation is essential in order to be able to use all out.bounz functions to their full extent.
Specifically, this affects the "Attachment Rule", "Recipient", "Sender", "Scope", "Mailbox" and "Record Rule" objects.
You can find these in the setup. Enter "Lightning App Builder" in the search bar.
 X
X
You can make the assignment for the respective objects in detail as follows:
Click on the page > Display > Activation > Assign to applications, record type and profiles > Select all apps that are used > Next > Desktop and Phone > Next > Select the relevant record type > Next > Select all profiles > Save.
Activate the following record pages:
| Objekt | Page | Record Type |
|---|---|---|
| Attachment Rule | Attachment Filter Rule Record Page | Filter |
| Attachment Limit Rule Record Page | Limit | |
| Attachment Order Rule Record Page | Order | |
| Attachment Preselection Rule Page | Preselection | |
| Recipient | Contact Recipient Record Page | Contact |
| Dynamic Recipient Record Page | Dynamic | |
| Lead Recipient Record Page | Lead | |
| User Recipient Record Page | User | |
| Sender | Dynamic Sender Record Page | Dynamic |
| User Sender Record Page | User | |
| Scope | Field Scope Record Page | Field |
| Free Scope Record Page | Free | |
| List Scope Record Page | List | |
| Primary Scope Record Page | Primary | |
| Mailbox | Gmail Mailbox Record Page | Gmail |
| Other Mailbox Record Page | Other | |
| Outlook Mailbox Record Page | Outlook | |
| Salesforce Mailbox Record Page | Salesforce | |
| Record Rule | Record Filter Rule Record Page | Filter |
| Record Limit Rule Record Page | Limit | |
| Record Order Rule Record Page | Order |
2.4. Configuration
Search for the "out.bounz" application in the App Launcher* using the search function.
 X
X
Switch directly to the "Configurations" tab in the app. You will already find a configuration data record here. In this data record, you must fill in the fields with the necessary information to configure out.bounz.
 X
X
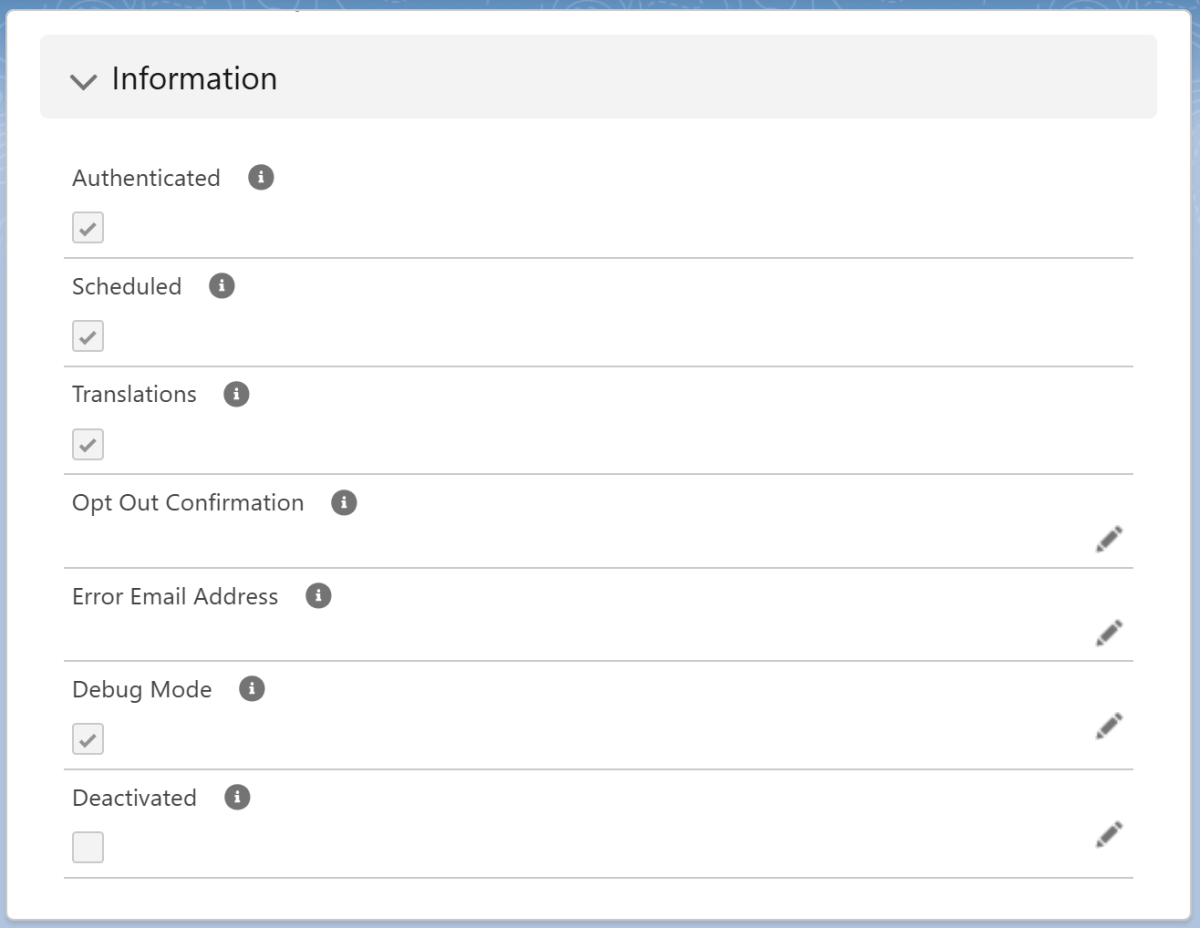
The following fields can be configured:
| Field | Mandatory | Description |
|---|---|---|
| Authenticated | Mandatory field | Indicates whether out.bounz is authenticated with Salesforce (link to authentication). |
| Scheduled | Optional | Indicates whether schedules are active. |
| Translations | Optional | Indicates whether translations are active. |
| Formality | Optional | Here you can select whether the translations of DeepL should be more ("more") or less ("less") formal. |
| Opt Out Confirmation | Optional | Here you can enter the URL to a page to which the user should be redirected after logging out. |
| Error Email Address | Optional | In this field you can enter an e-mail address to which notifications will be sent in the event of an error. |
| Debug Mode | Optional | This setting is used for the extended display of communication details between Salesforce and the out.bounz interface. CAUTION: We recommend that you only activate this setting after consulting with out.bounz support, as this may make sensitive access and/or transaction data visible to other system administrators. |
| Deactivated | Optional | Should not be ticked by default. This setting can be used to completely deactivate out.bounz. |
2.5. Trial version
You have the opportunity to test out.bounz for 30 days free of charge and in full. You do not have to enter any account details. After 30 days, the test phase expires automatically and you can no longer access out.bounz.
If you want to test out.bounz in a sandbox, the installation process works exactly the same as in the live environment. The only exception is if the sandbox is a partial copy in which the configuration data set has been transferred. In this case, the "Reset Configuration" button in the configuration data set must be used to ensure smooth operation.
2.6. Order licenses
Once you have set up the configuration data set, you still need to complete the purchase process.
This step is particularly important so that you can use out.bounz!
The licence fees for using out.bounz will be collected by direct debit from the account you have specified. This allows you to enter your relevant information:
In the out.bounz app, you will find the "Manage Licences" button at configuration record level. Click on the button to open a login page to your licence management area. In this customer portal, you will find all the important data about your out.bounz licences, payment information and the option to book additional licences with a click.
To log in, you will receive a personalised code by email, which you enter in the login screen. After logging in, the overview page will open with some instructions on what information you need to provide us with so that you can use out.bounz in the future.
By clicking on "Check your billing address", you can enter a valid billing address. Then click on "Check your SEPA direct debit mandate" to issue a valid SEPA direct debit mandate. You will also find the input masks for your data below in the "Billing" and "Payment" tabs.
After you have entered and saved the necessary data, you will receive a confirmation email from us and a document with all the information about your SEPA direct debit mandate.
Please note: The email with the confirmation will be sent to the email address that was entered during the out.bounz download in the Salesforce AppExchange! If this email is not available, simply send us a message to support@outbounz.com
 X
X
2.7. Authentication
Once the record is created and you have deposited your payment information, you need to authenticate with the out.bounz servers to ensure all available functionalities.
This authentication is done once. To do this, simply click on the "Authenticate" button in the created record.
After successful authentication (which may have to be finalized by confirming the OAuth2 query), the user is forwarded to a results page. If successful, the authentication is indicated by a check mark in the "Authenticated" field.
In case of successful authentication, the following message appears:
 X
X
The check mark under "Authenticated" is then also set in the configuration record.
 X
X
Note: For advanced security, we strongly recommend enabling Login IP Ranges for the integration user's profile (the user who is authenticating). This restricts access to this user from our server only. The IP address ranges to be defined are:
- IP Start & End Address: 92.205.105.248
- IP Start & End Address: 2a00:1169:11d:7b40::
2.8. Adding recipient types
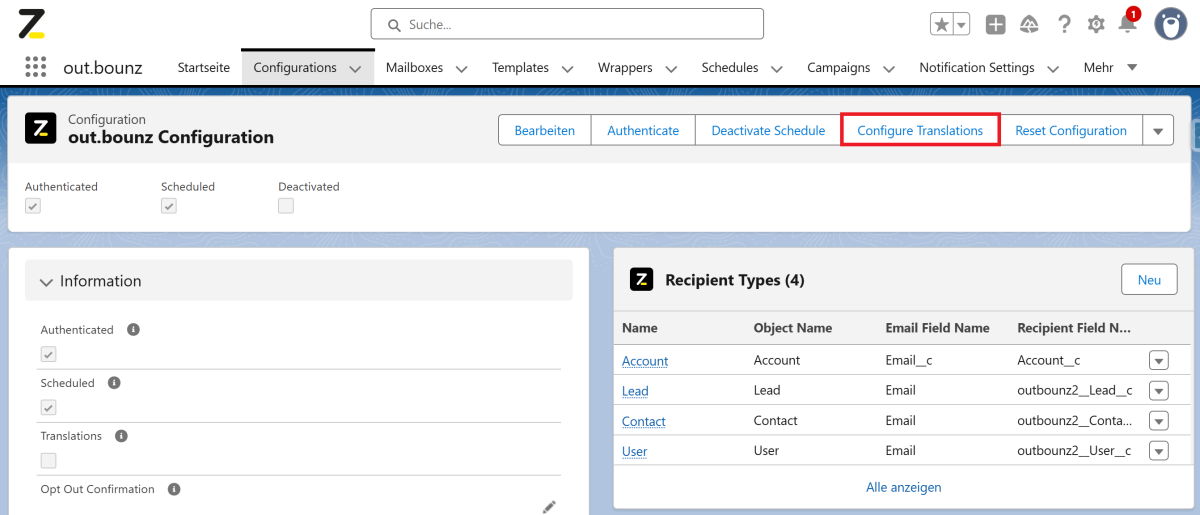
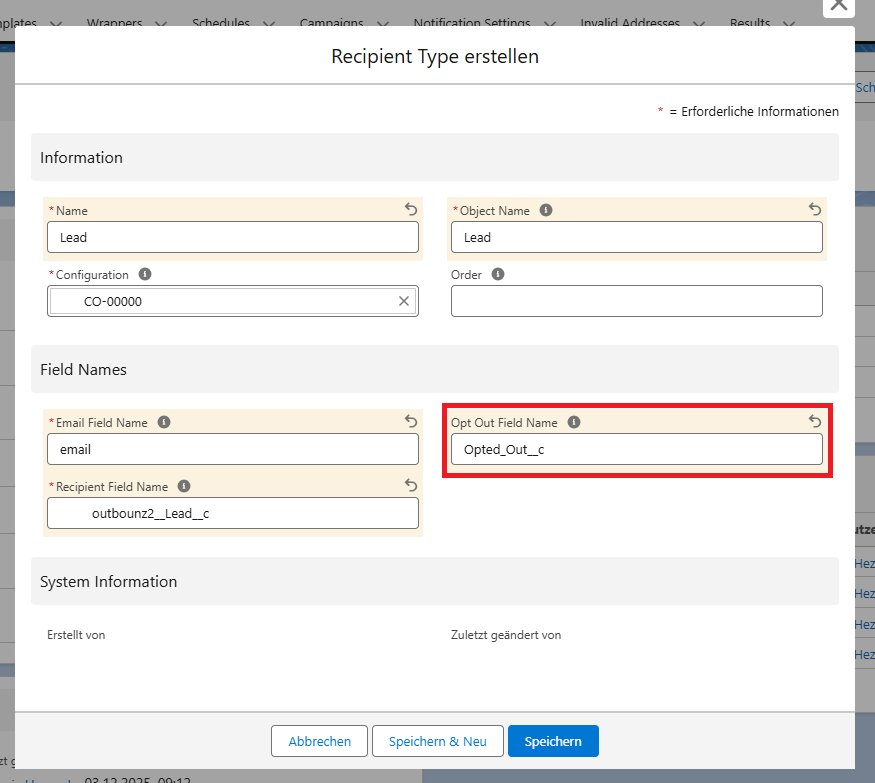
With out.bounz you can send emails to any object/record (whether custom or standard) in your Salesforce organisation. You can see the recipient types on the right-hand side of the "Configuration" data record under "Recipient Types". We have already created the recipient types for "Lead", "Contact" and "User" for you. To add a new recipient type, click on "New" next to "Recipient Types".
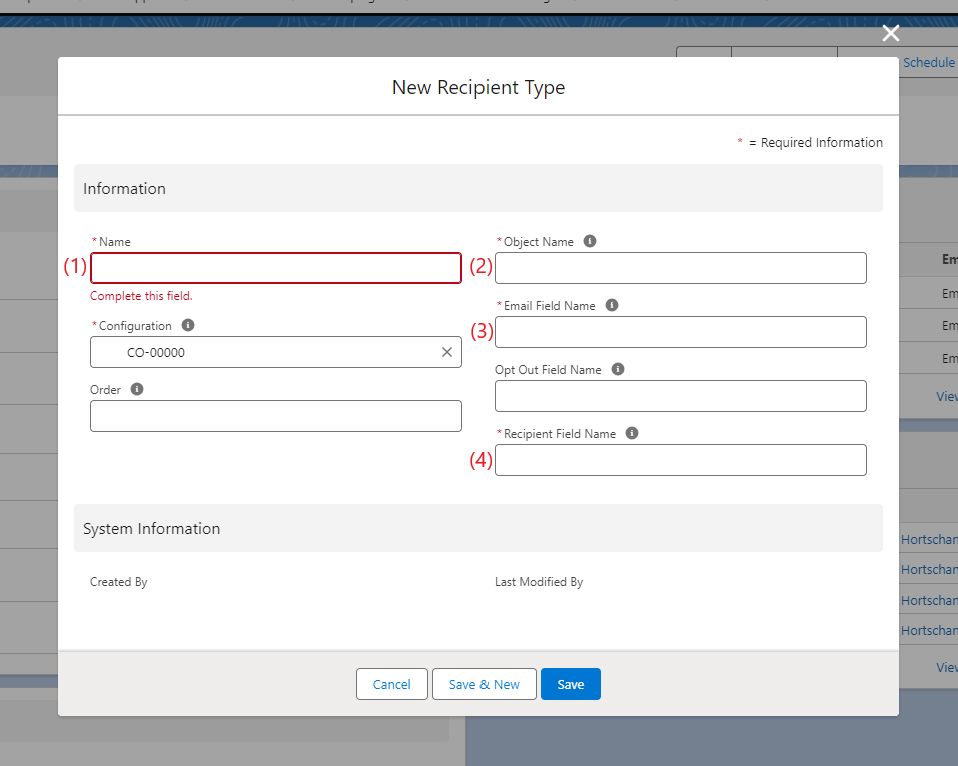 X
X
Here you can name the data record (1), enter the name of the object to be sent to (2), the field name within the object in which the email address is located (3) and the API name of the field at "Recipient-Object" level that contains the reference to the data record to be sent (4). You can find the latter (4) under Setup > Object Manager > Recipient > Fields & Relationships > Field Name. Optionally, you can select the order in which the recipient types are to be listed under "Order" and specify the name of the field containing the unsubscribe information under "Opt Out Field Name" (this must be a field of type "Checkbox" that you have created).
2.9. Enable translations
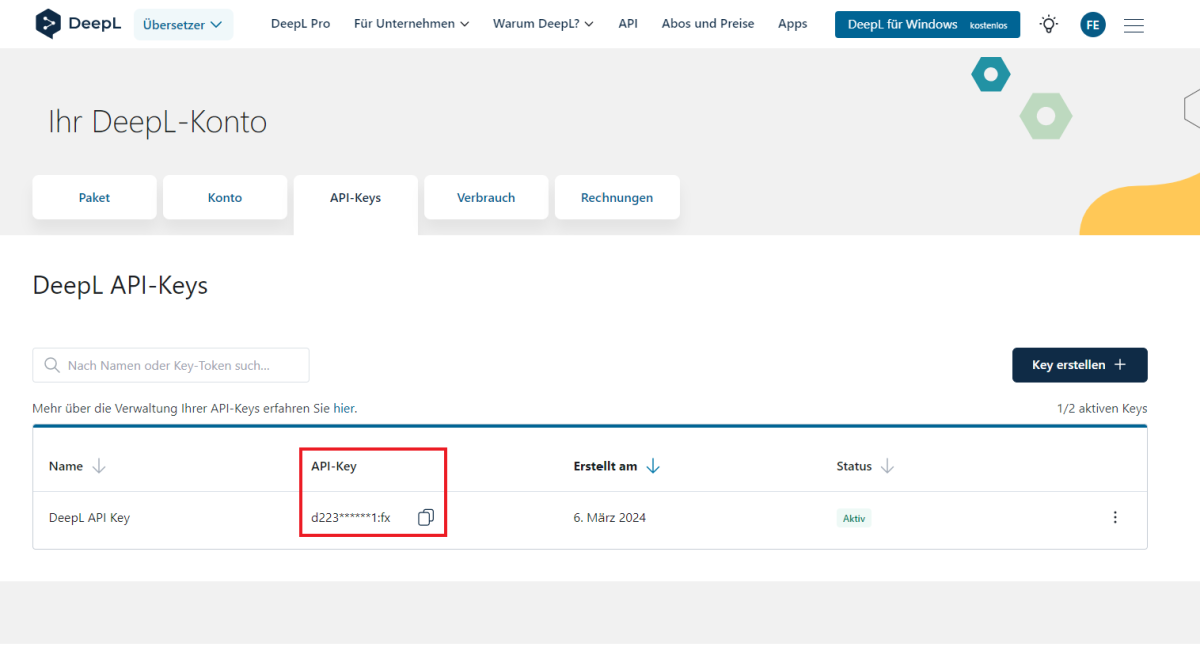
To use the integrated DeepL translator, you must first configure the translation function. To do this, you need an DeepL account and the authentication key for the account. You can find this within your DeepL account.
 X
X
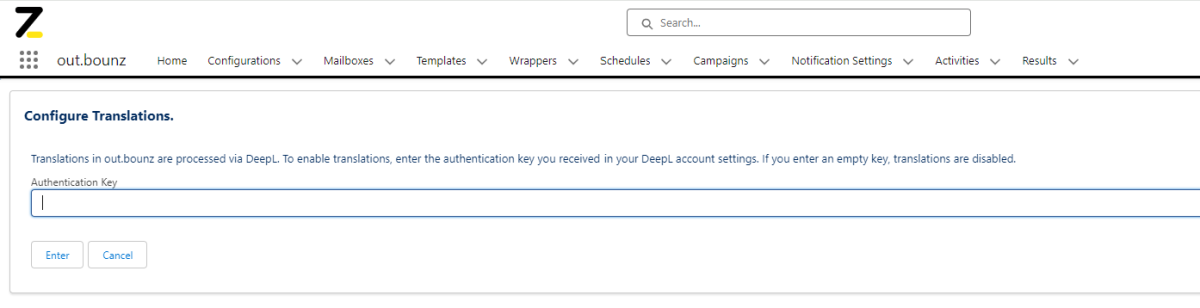
If you now click on the "Configure Translations" button in the "Configurations" data record, you can enter the authentication key here.
 X
X
The tick under "Translations" is then also set in the configuration data record.
 X
X
2.9.1. Configuration of DeepL For Salesforce
To use DeepL For Salesforce for translation, the app must be installed and configured in your Salesforce organization. For more information on installing and configuring DeepL For Salesforce, please refer to the product documentation: DeepL For Salesforce Product Documentation
Configuring the translation function (DeepL Translate)
When configuring templates, the following properties must be taken into account:
- The template type must be "Text"
- The Source Language must either be left blank or contain the language in which your emails will be written. Templates with an incorrect source language will not be recognized by out.bounz.
- The Target Language must match the recipient's language. It is essential to define the "Language Field Name" for recipients in out.bounz, which is used to store the recipient's language.
Note on automatic template selection: out.bounz automatically searches for suitable templates for translation based on the above criteria. It is therefore essential that a separate template is created for each language for which translation is potentially required.
Configuring optimization with DeepL Write
To use DeepL Write optimization, the following configurations must be made in the templates:
- The template type must be "Text"
- The Target Language must either be left blank or contain the language in which your emails are written. Templates with an incorrect target language will be ignored by out.bounz.
Note on the DeepL Write functionality: The Write functionality is currently only available in the beta version. Line breaks are not yet supported by DeepL, which means that emails optimized with the Write function must be reformatted manually afterwards. As this is a DeepL issue, out.bounz and DeepL For Salesforce are not yet able to resolve this problem.
2.9.2. Connection to out.bounz
To configure the connection between DeepL For Salesforce and out.bounz, select the “Configurations” tab in out.bounz. Then click on the “Configure Translations” button to start the connection.
 X
X
Now click on “Link” in the newly opened window. out.bounz automatically detects whether DeepL For Salesforce is installed in your organization and takes care of the connection for you. After you click on “Link,” the window closes and DeepL For Salesforce is successfully connected to out.bounz. You can also check that everything has worked by clicking the “Translations” checkbox. The box is now checked.
 X
X
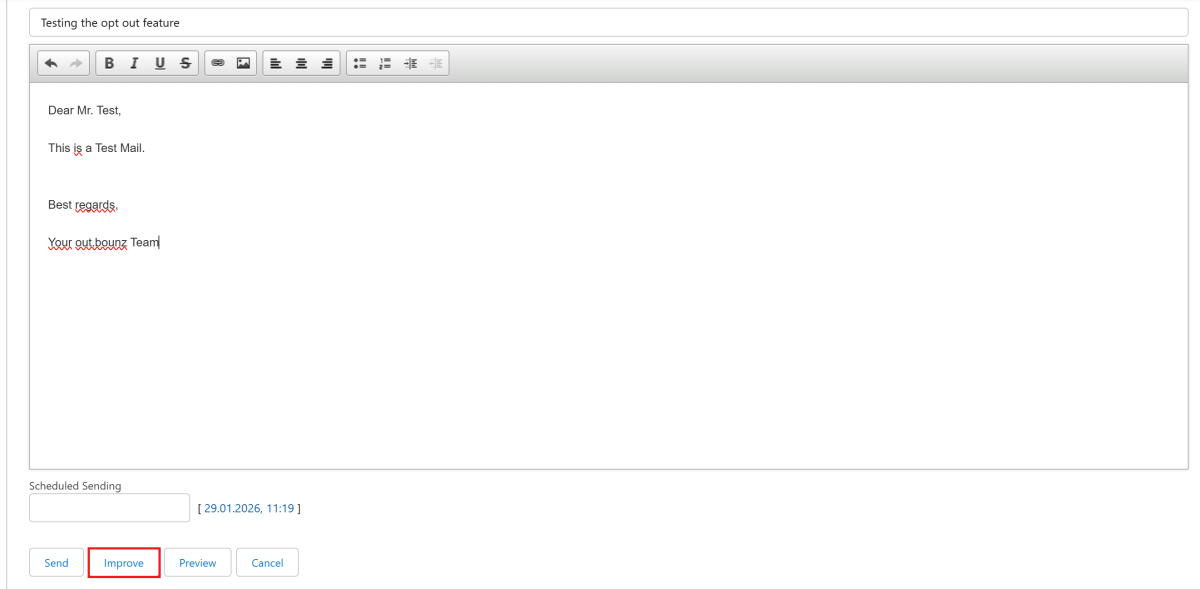
The function is actually used when the email is sent. If emails are sent automatically, the translation is also automated. If an email is sent manually, the translation is done automatically, and the Write function can be executed optionally using the “Improve” button.
 X
X
2.9.3. Outdated version via API key
If you are already using the existing translation function of out.bounz (by connecting to DeepL with an API key), you can of course continue to use it as you wish. However, if you use it frequently, we recommend switching to DeepL For Salesforce, which allows you to take advantage of DeepL For Salesforce's configuration options for more efficient and precise translation of your emails.
Note: You can also leave your API key activated in out.bounz as before or change the API key as desired. However, once the previous translation function has been deactivated, only the connection via DeepL For Salesforce will be possible (it will then no longer be possible to reactivate the old translation function).
2.10. Resetting the configuration
You can reset out.bounz to the configuration data record level by clicking on the "Reset Configuration" button at the top right. This will delete all results data records.
Authentication must also be carried out again.
The "Deactivated" checkbox allows you to stop all out.bounz functions manually.
3. Operational use of out.bounz
In this chapter we describe how you can get the most out of out.bounz. This also requires minor configurations, which - like the configurations already done - only need to be carried out once.
We will show you the settings based on a few use cases to make the configuration more clear. Of course, you can configure and use out.bounz for your own individual use case and with your own custom objects.
3.1. Mailboxes
Mailboxes are the mailboxes from which you want to send your emails.
You can add 4 types of mailboxes:
Salesforce
Gmail
Outlook
Other
You can authenticate Salesforce mailboxes via organisation-wide email addresses, Gmail mailboxes via an app password and Outlook mailboxes via OAuth. For the "Other" type, you can enter SMTP information and set a password.
Salesforce mailboxes
We have already automatically created a Salesforce mailbox for all active users in the organisation. You just need to activate them.
To activate the mailbox, you must first define which people in your organisation should have access to the mailbox and who is allowed to send emails from this mailbox. To do this, click on the "Manage Relations" button at the top right of the page. For Salesforce mailboxes, you must first approve the other users for your user via the organisation-wide email address.
 X
X
Here you can add the users.
Next, you can test whether the mailbox works by clicking on the "Test" button. A test message will be sent to your email inbox.
Now you can activate your mailbox by clicking on the "Activate" button.
 X
X
After successful activation, you will receive an email from this mailbox to your email address.
You can also use the "Configure" button to define an organisation-wide email address and assign users to this address.
 X
X
Note: If you want to send an email via Salesforce, make sure that your email address is verified, otherwise the email will not be sent. It will be logged and marked as sent, but will not reach the recipient. The reason for this is that the email is then transferred to the server, but is not sent by the server due to the lack of verification.
Finally, you can define a wrapper for your mailbox.
Adding further mailboxes
To add further mailboxes, go to the "Mailboxes" tab and click on "New".
 X
X
You can use the "Send Invitation" button to invite the user by email to enter a mailbox password to use out.bounz for their mailbox. The password is stored securely so that no other Salesforce user can access it. You can also add a personal message to the email.
 X
X
The first thing you need to do is set a password. For Gmail mailboxes, we recommend generating an app password* via the settings and using this to set up the connection.
You then set the password in the Gmail mailbox by clicking on the "Set Password" button.
 X
X
For the Outlook mailbox, you must authorize your mailbox. The user or administrator can carry out the authorization for Outlook via the "Authorize" button. If this has been carried out successfully, the checkbox in the "Authorized" field is ticked.
Now you can add shortcuts, test and activate the mailbox and add a wrapper, just like with the Salesforce mailbox.
You can also use the "Display Name" field to specify a display name that the recipient of the email will see instead of the name of the sending user.
Note: You can deactivate your mailbox at any time by clicking on the "Deactivate" button.
3.2. Templates
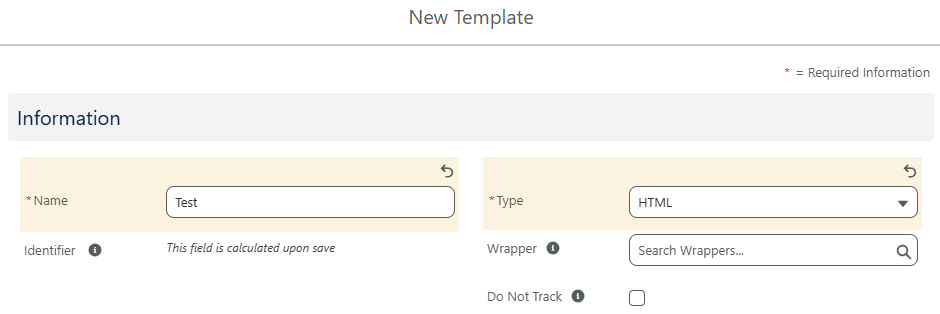
Templates are email templates that you later send out to your recipients. You can create a template by clicking on the "New" button at the top right of the "Templates" tab.
 X
X
An interface for creating a "template" data record opens. Fill in the following fields for the configuration:
| Feld | Mandatory | Description |
|---|---|---|
| Name | Mandatory field | Own, freely selectable name of the template. |
| Type | Mandatory field | Here you can choose between "HTML" and "Mixed". The difference is that with "Mixed" line breaks are also interpreted and with "HTML" a must be used for this. |
| Wrapper | Optional | Here you can define a wrapper for your template. |
| Do Not Track | Optional | Here you can specify whether emails sent from this template should be tracked. Bot activities as well as activities from Salesforce servers are automatically ignored. |
| Language | Optional | Here you can select the language in which the template is written (important for the translation function). |
| Attachment Required | Optional | Here you can specify whether an attachment is required when sending the email. |
| Attachment Batch Size | Optional | Here you can set the maximum number of attachments for automatically sent emails. |
3.2.1. Configuration
After creating the template, you can start the configuration. Templates contain multiple sections which can be complicated at first, so we will go through them one by one.
Scopes
Scopes allow you to load data from your Salesforce Organization into the template. After creating the template, you now must define a "Primary Scope". The primary scope is the object to which you want to send the email. For example, if you define the primary scope as "Lead", you can access all fields of the "Lead" object in your template. To create a primary scope, click on the "Create primary scope" button at the top right.
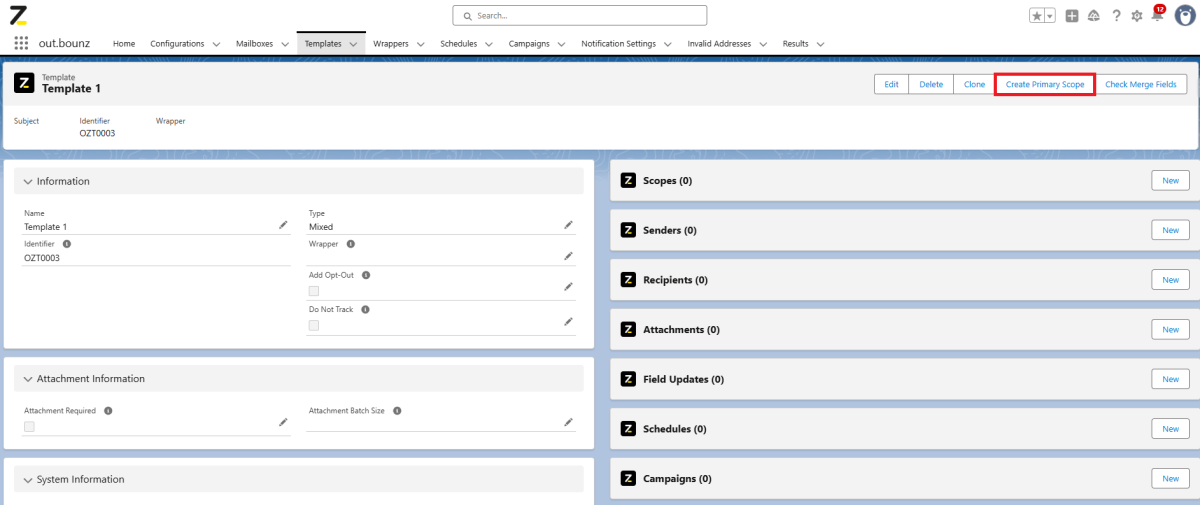 X
X
In addition to the primary scope, you can create field scopes and list scopes within the primary scope, as well as free scopes which do not have to link to the primary scope. To create a scope, click the "New" Button in the "Scopes" section.
Within a scope, you can further configure the following fields:
Children: Here you can see the Child-Scopes of your current scope, and with "New" or "Create child scopes" you can create new child scopes.
Field Updates: Here you can define updates to fields of your scope. Field updates will be explained in detail later in this documentation.
Attachment Rules: Here you can set rules for dynamic attachments. All files contained within the scope object can be selected as dynamic attachments. Using Attachment Rules, you can specify which of these files will actually be attached to the email. You have four options:
Filter
Order
Limit
Preselection
"Preselection" lets you define what attachments should be included by default, Filter, Order and Limit will be explained in a moment for the Record Rules.
Often when you define List Scopes, you don't want to include every entry of the list, but only those you explicitly need for sending your email. For this you can define Record Rules. A Record Rule can apply one of three operations to your list scope:
Filter: Lets you define a condition based on a field which must be satisfied for the entry to be included in the list scope.
Order: Lets you define an ordering of the list based on a specified field. If you have more than one Order Record Rule, you can define priorities, which control in which way the Order Record Rules are applied.
Limit: Lets you set a numerical limit for entries from the list to be included. A Limit Record Rule will always be applied after all other Record Rules for consistency.
Note: You can also define Record Rules for Free Scopes, as Free Scopes can be Lists, too.
Senders
Here you can specify the sender of your email. Click the "New" button in the "Senders" section to create a new sender. You can choose between a dynamic sender, which can be different for every mail sent, or a User that will be the sender for all mails.
It is possible to create multiple senders for one Template. If there are multiple senders, you can set "Priorities" to define the relative priority of one sender to the others. This is important if a sender does not exist and you want to specify a replacement sender to be on the safe side.
Recipients
You must also define receivers for the template. To do this, click on the "New" button in the "Recipients" section. Here you can choose between "Dynamic" or your preconfigured recipient types. Then enter a name, the template and the scope. Under "Category" you can choose whether you want to send the email directly to the recipient with "To" or whether you want to set the recipient to CC or BCC.
Attachments
You can also add static attachments to your email. To do this, click on the "New" button in the "Attachments" list. Here you can give the attachment a name and specify the order of the attachments under "Order". You can then upload the attachment under Attachments.
Field Updates
With Field Updates, you can specify whether and which fields of the scope should be updated after an email has been sent. To do this, click on the "New" button in the "Field Updates" record. Here you can give the record a name, specify the scope and enter the name of the field that is to be updated after the email has been sent under "Field Name". Under "Operator" you can specify the comparison operator to be compared, under "Condition Value" the current value of the target field and under "New Value" the target value for the updated field. The value in "New Value" is therefore only written here if the condition specified in "Operator" applies (e.g. only write to a field if it is empty beforehand).
Further Configurations
Notification Settings: This shows whether notification settings exist for this template and whether they are active
Results: Results with information about emails sent using this template are displayed here
Email Messages: This shows which emails have been sent using this template
Template History: History of the template objects you have created
3.2.2. Writing the Email
Now you can fill your email template with data in the "Content" area:
Subject: The character string that is to form the subject of the email is saved here. You cannot use HTML tags here as these are not interpreted.
Body: Here you can write your text either in pure HTML or mixed, depending on the "Type" specified. Examples of the use of scopes in the template can be found in the following example.
Mergefields
You can dynamically access data from your Scopes using Mergefields. Use the following syntax to add the content of a field into your email:
{ScopeName.FieldName}
where ScopeName describes the API-Name of your scope and FieldName describes the API-Name of the desired field. For example, {Lead.Name} would dynamically display the name of the respective Lead.
Integration of lists using Mergefields
Mergefields can also be used in the context of a list. To apply the mergefield operation to all entries of the list, you will need to use a slightly different syntax.
You can open an area for your content that should be displayed for every list element by using {tableStart:ScopeName}, where ScopeName denotes the API-Name of your scope. After that, we find ourselves in a loop that performs each operation defined here for every element in the list. Here you can now define the actual merge fields.
To close this loop use {tableEnd:ScopeName}. After this statement the list iteration is closed and you can continue writing your email.
Here you can see an example of the syntax for mergefields for lists:
{tableStart:Products}
{Product.Name} : {Product.Price}
{tableEnd:Products}
In this example, both the name and price are displayed for each product from our “Products” list. This is a simplified example; you can, of course, work with mergefields here as you like.
Note: If you use HTML or external tools such as Unlayer when creating your template, the preview in Salesforce may not match the actual display in the final email. This is due to Salesforce's simplified rendering engine, which does not display certain HTML and CSS structures (e.g. responsive layout) correctly. We recommend sending a test email to check the layout before finalising it.
Condition-based data integration
out.bounz allows you to integrate data into your emails based on a condition that is evaluated dynamically. This can be helpful if you want to display different content depending on a value in your Salesforce Organisation. The syntax for condition-based content is as follows:
IF({ScopeName.FieldName} == "condition", "Content if true", "Content if false" )
The content in parentheses refers to the following:
Condition: This is where you specify the condition to be evaluated. A merge field is mandatory here, as the condition should evaluate based on data from your Salesforce Organisation. This is followed by the operator and the condition value. out.bounz supports the following operators:
== (true if the values are equal)
!= (true if the values are not equal)
<, > (true if the value is truly smaller/larger than the condition value)
<=, >= (true if the value is less than or equal to/greater than or equal to the condition value)
You can use these operators to compare numerical values as well as dates and times.
For textual comparisions, there are two additional operators:
contains (true, if the field contains the condition value)
not contains (true, if the field does not contain the condition value)
The condition is followed by the content that is inserted if the condition evaluates to true. Merge fields are possible here.
Finally, you must specify the content that is inserted if the condition evaluates to false. Here, Merge fields are possible as well.
These three parts inside of the brackets must be separated by commas.
In the following example, we want to use a custom checkbox "FirstNameBasis" of our scope "Contact" to dynamically decide on how to address a contact in our E-Mail. Our condition will then look like this:
Hello IF( {!Contact.FirstNameBasis} == true, {!Contact.FirstName} , {!Contact.FirstName} {!Contact.LastName} )
For a Contact with the Name "Max Mustermann" this will result in either the output "Hello Max" or "Hello Max Mustermann", depending on the "FirstNameBasis" checkbox.
3.2.3. Button for sending
However, before you can send an email semi-automatically (not via Schedule or Campaign), you must first display a button on the details page of the object with the name "Send Mail" . To do this, go to Setup>Object Manager>Here you select the object to which you want to send the email>Buttons, Links, and Actions>New Button or Link>Here you then enter the following data:
Label: Send Mail
Name: Send_Mail
Display Type: Detail Page Button
Content Source: URL
Syntax:
/apex/outbounz2__SendMessage?id={![object].id}&template=[TEMPLATEID]&user=[USERID]&mailbox=[MAILBOX]&language=[LANGUAGE CODE]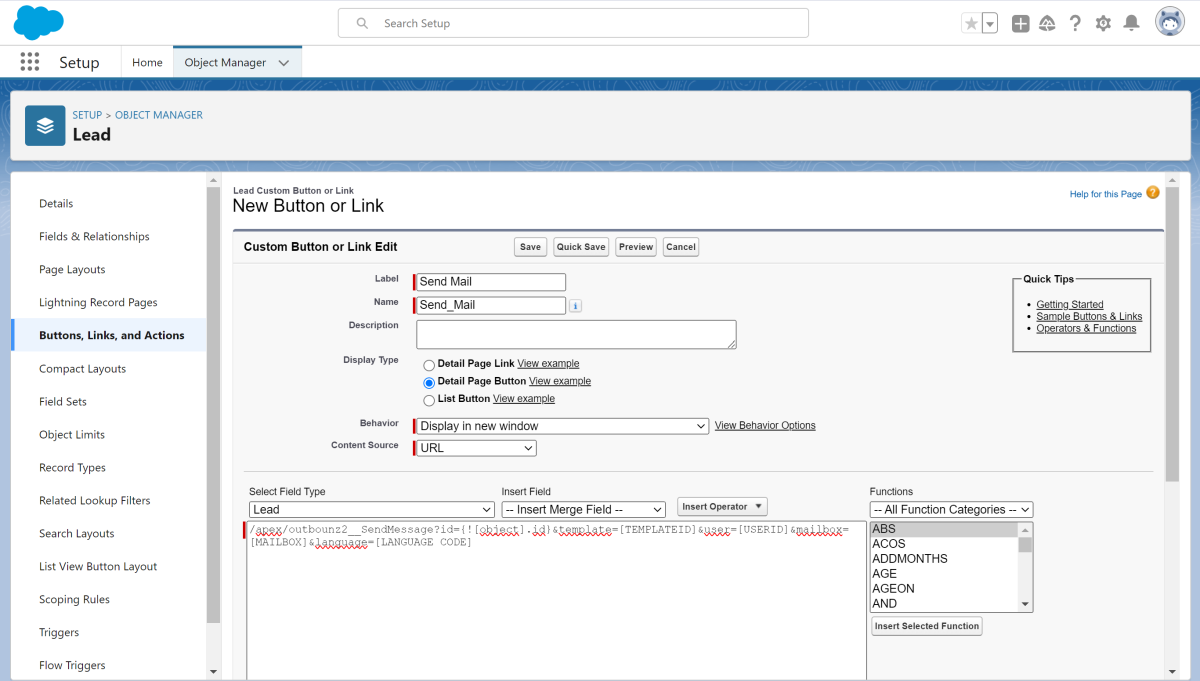 X
X
For [object], enter the object of the primary scope in the template.
For [TEMPLATEID], enter the ID of the template. This can be found on the template record page and has the following form: OZTxxxx, where x is a number. The first template therefore has the identifier OZT0001.
The other parameters are optional.
For [USERID], enter the ID of the user from whom the email is to be sent.
For [MAILBOX], enter the email address from which the email is to be sent.
For [LANGUAGE CODE] you can enter the language code of the language to be translated for the sending user (e.g. EN for English).
Once you have added the button to the layout, you can now use it to send a single email to the recipient defined in your data set.
3.2.4. Opt-Out Functionality
out.bounz offers an opt-out functionality for templates, which allows the recipient of the email to unsubscribe from the mailing list. To activate this function, a few additional configuration steps are necessary, which we will briefly go through here.
1. Definition of a custom Opt-Out-Field
To use the opt-out function, each record that will be used as a recipient of an email requires a field of type “Checkbox” in which the opt-out status can be tracked. For static recipient types, this field must be defined in the “Opt Out Field Name” area at the “Configurations” level. For dynamic recipients, the field is provided at the “Template” level when the recipient is created.
In the following example, we have added the checkbox “Opted_Out__c” to the object “Lead,” which we will use for tracking. When we now create “Lead” as a static recipient type, we specify this checkbox:
 X
X
2. Configuration in the Template
There are two ways to provide the opt-out option for the recipient in a template: As a header or as a link. In both cases, the recipient is redirected to a page where they must reconfirm their opt-out choice before the decision is transferred to the recipient's record in Salesforce.
Note: If translations are enabled for out.bounz (see 2.6 Enable translations), the opt-out page will also be displayed in the recipient's language. If translations are not enabled, the active user's language will be selected by default.
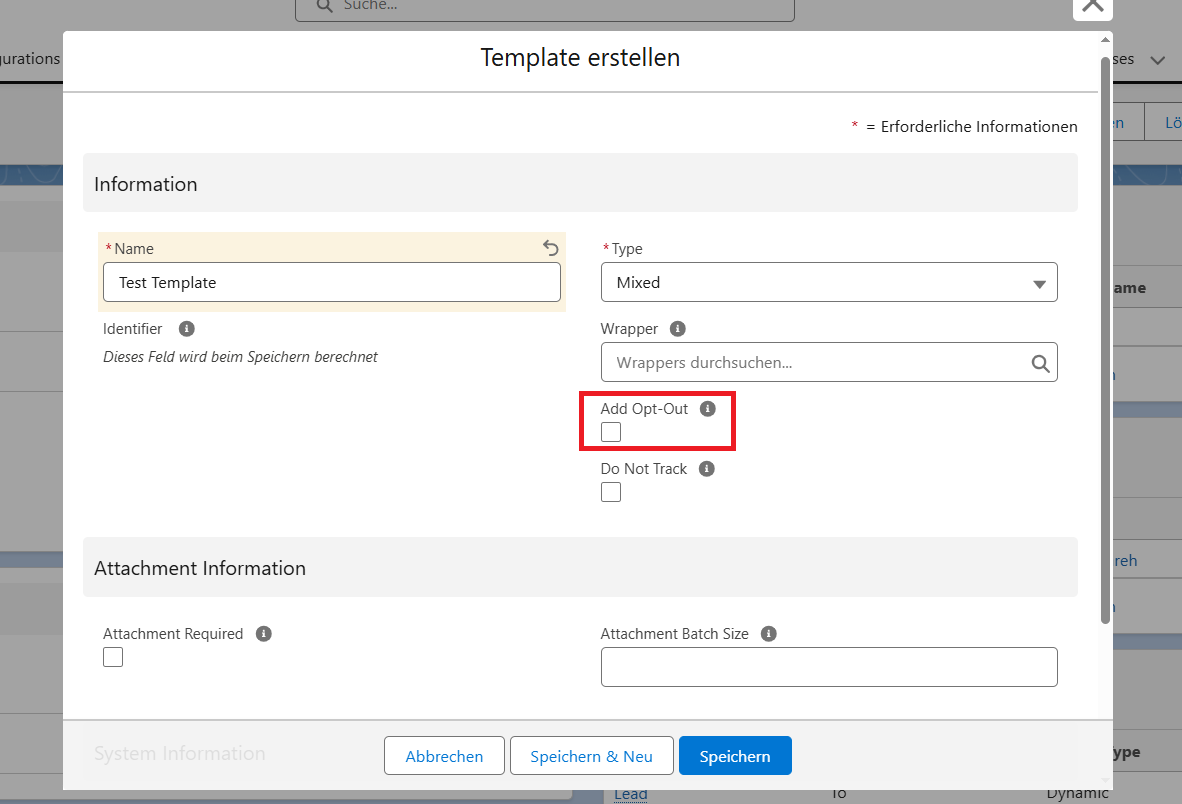
Opt-Out-Header
When creating the template, there is a checkbox called "Add Opt-Out". If this checkbox is clicked, a custom header is added to every email sent using this template, allowing the recipient to unsubscribe with a single click and fill in the predefined opt-out field accordingly.
 X
X
Note: Since the “unsubscribe” header is influenced by the client when sending, among other things, the recipient may experience unpredictable problems when displaying the header. The header is always guaranteed to be sent, but may not be displayed correctly in all cases.
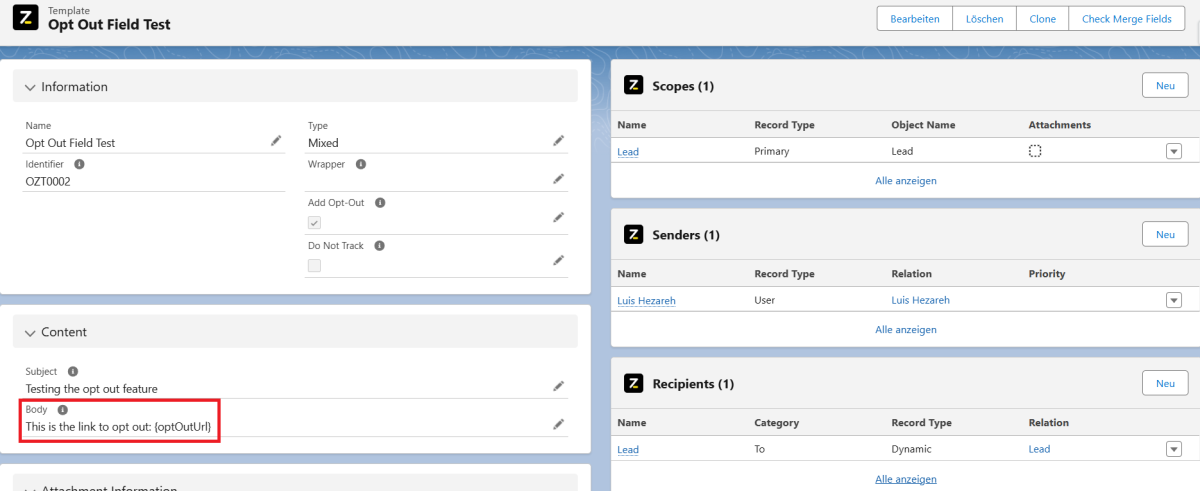
Opt-Out-Link
out.bounz also offers the option of embedding a link to use the opt-out function. You can use any custom link, but we recommend the preconfigured out.bounz opt-out link, which can be inserted into the email using the merge field {optOutUrl}.
 X
X
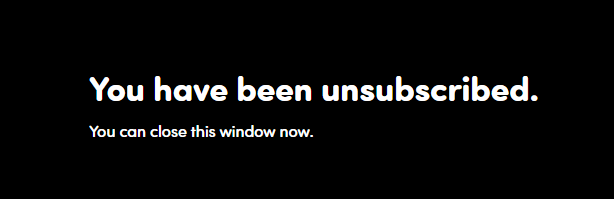
Like the header, this link allows the recipient to unsubscribe from the mailing list with a single click, which is then confirmed again in a new window.
 X
X
Note: Using the opt-out function for schedules and campaigns requires the configuration of a “target filter”, which prevents messages from being sent to recipients who have opted out. For more information, see the "Filter Block" sections of "Schedules" and “Campaigns”.
3.2.5. Example
You have already made contact with a lead and would now like to know how far along they are by sending them a reminder email.
We create a template for this.
Name: Reminder
Type: Mixed
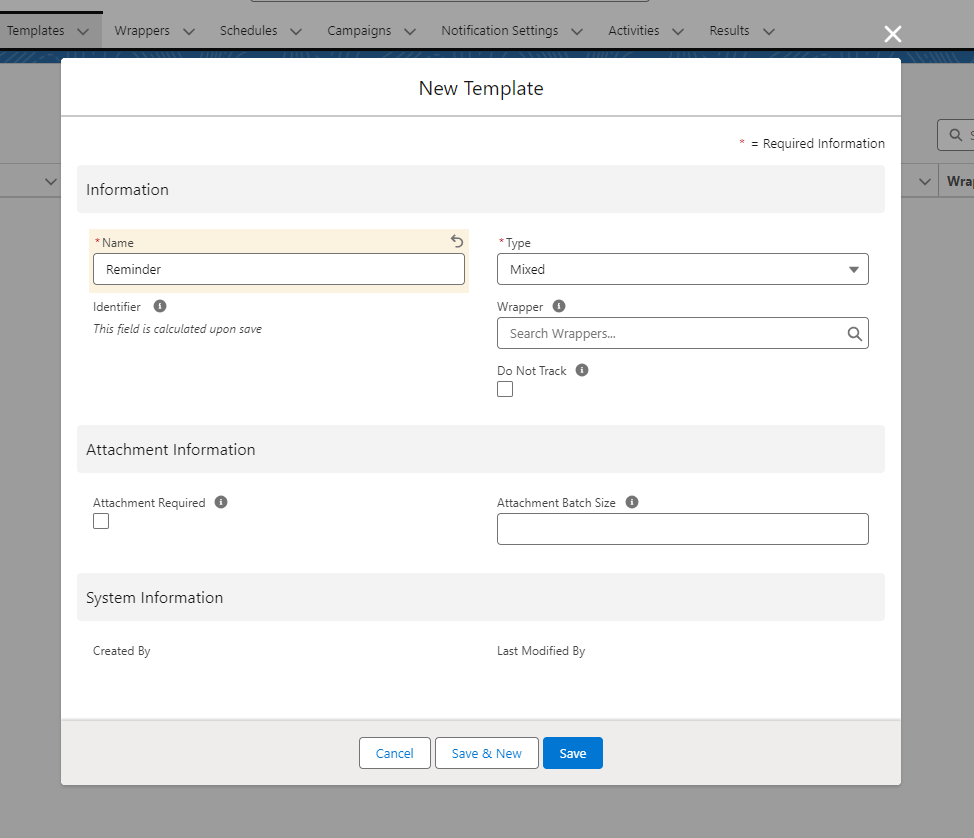 X
X
Click on "Save" and then on "Create Primary Scope".
Here we are looking for the "Lead" object.
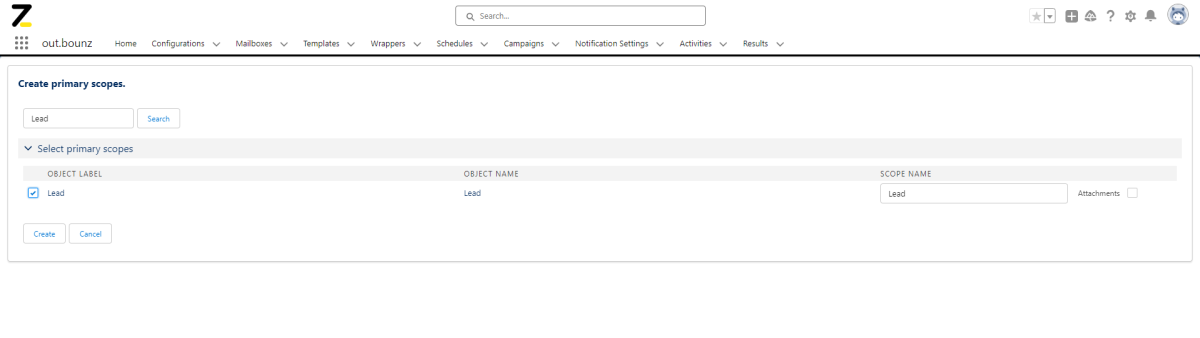 X
X
Click on "Create"
We can now access all fields of the lead object.
For the lead, we also want to be able to specify at the click of a button whether we can address the lead in the email on a personal level (by first name) or not. To do this, we create a field of the type "Checkbox" with the name "First Name Basis".
To do this, we go to Setup>Object Manager>Lead>Fields and Relationships>New>Checkbox
Enter the following information here:
Field Label: First Name Basis
Field Name: FirstNameBasis
Default Value: Unchecked
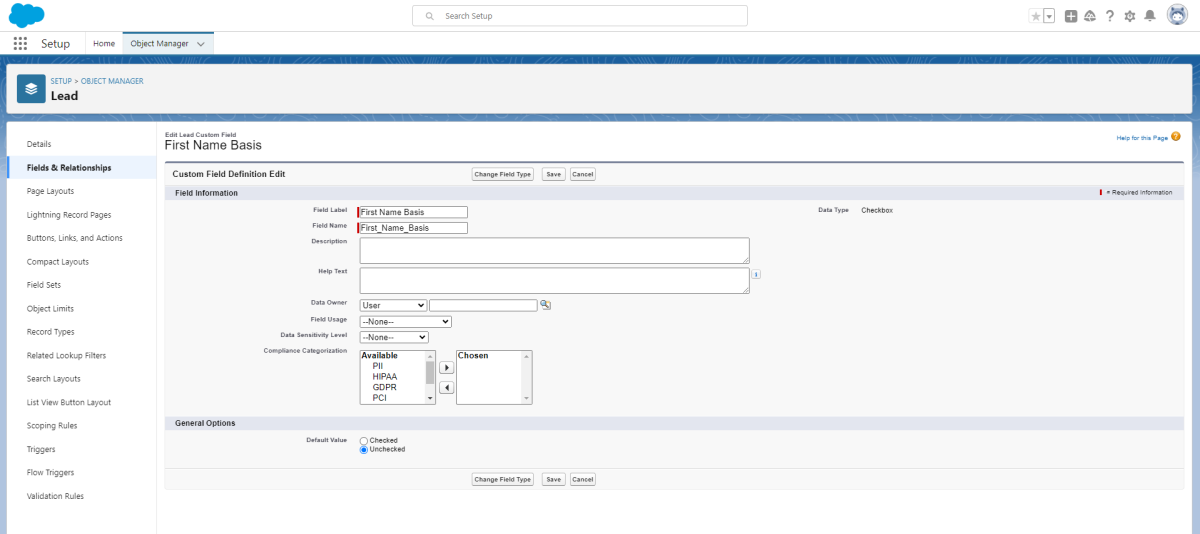 X
X
Now we can fill our email with content. We enter the following information:
Subject:
IF({Lead.FirstNameBasis__c} = true,"Deine","Ihre") Anfrage zu einer möglichen Zusammenarbeit
Body:
Hallo IF({Lead.FirstNameBasis__c} = true,"{!Lead.FirstName}","{!Lead.FirstName} {!Lead.LastName}"),
unser letzter Call ist schon ein paar Tage her.
Habt ihr euch bereits mit dem Thema -Salesforce&cloudworx- auseinander setzen können?
Würde mich über ein kurzes Feedback sehr freuen und bin gespannt, wie der Stand der Dinge bei euch ist.
Wenn es noch offene Fragen, Wünsche oder Unklarheiten gibt, komm gerne via Mail auf mich zu.
Beste Grüße und bis bald
IF({Lead.FirstNameBasis__c} = true,"{!User.FirstName}","{!User.FirstName} {!User.LastName}")
Here we use mergefields to access the fields of the lead object. We use IF Conditions to determine when we write the email for the lead more personally and when we write it more formally.
We have now created the template and are ready to send it out.
The last step now is to create a button at lead level that we can use to send the email. We therefore create a button called "Reminder" at lead level.
To do this, we go to Setup>Object Manager>Buttons,Links, and Actions>New Button or Link
Here we enter the following information:
Label: Reminder
Name: Reminder
Display Type: Detail Page Button
Content Source: URL
Syntax: /apex/outbounz2__SendMessage?id={!Lead.id}&template=OZT0001
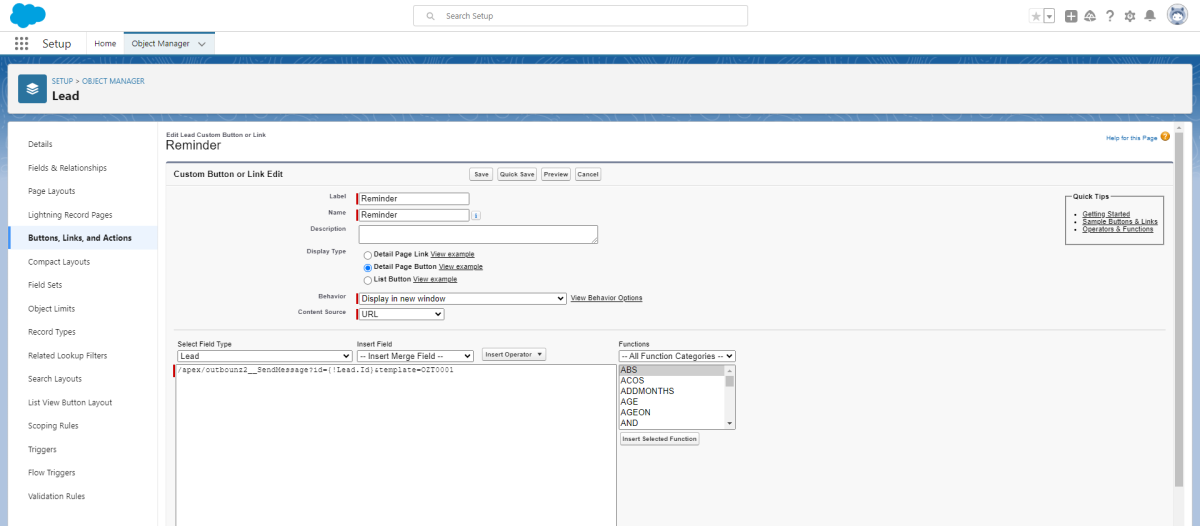 X
X
If the ID for the template is different from OZT0001, you must adjust this in the syntax.
The button should now appear at lead level. Now simply go to the lead to which you want to send the email and click on the button.
 X
X
Here you can finalise the email, add recipients if necessary and send the email.
3.2.6. Unlayer Editor
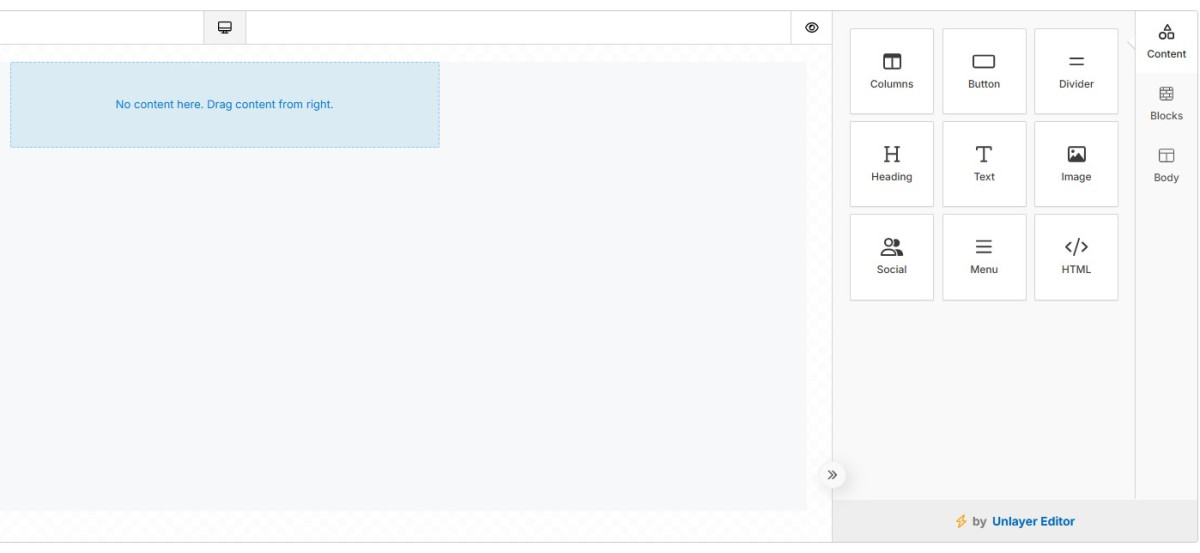
With out.bounz, you have the option of using the official Unlayer Embed Editor. This offers an intuitive and visual interface that allows you to create and edit HTML email templates directly in Salesforce.
We are happy to support you and your team with setup and implementation. If you are interested, please contact your personal contact person for out.bounz at any time.
 X
X
You can access the Unlayer Editor by selecting the "Editor" button on the overview page of a newly created template.
Note: When working with the Unlayer Editor, the Type of the template should always be set to "HTML".
 X
X
The Unlayer Editor opens with the familiar user interface.
 X
X
The functions available in the editor depend on the pricing model you have activated for Unlayer Embed. You can find a complete overview in the official Unlayer documentation.
The following buttons are available at the bottom of the editor:
 X
X
Save: Saves the email template and closes the editor. You will then be automatically redirected back to the template details view.
Quick Save: Saves the changes without closing the editor. This feature is particularly useful for quickly checking merge fields, for example, without having to reopen the editor each time.
Cancel: Closes the editor without saving. All changes made since the last save will be lost.
Note: After saving for the first time using the Unlayer editor, it is no longer possible to view or edit the underlying HTML code directly within out.bounz. Although the code is technically processed and saved, it is not visible as plain text in the template. In addition, the ‘Body’ field is automatically hidden after saving for the first time using the editor.
Mergefields in the Unlayer Editor
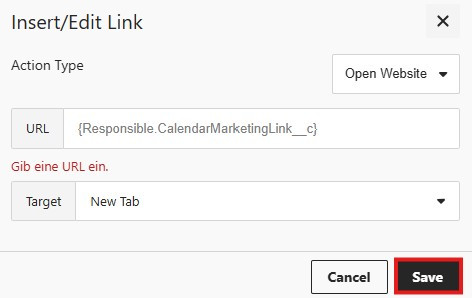
Important: Even though the direct use of Salesforce merge fields in HTML attributes is technically valid HTML syntax, it can cause errors in the Unlayer editor. Example:
<a href="{Responsible.CalendarMarketingLink__c}">
    <b>{Responsible.FirstName} {Responsible.LastName}</b>
</a>
In this case, the display text (e.g. "Manuel Neuer") is replaced correctly, but the link target (e.g. the employee's personal Calendly link) may not be transferred correctly.
To ensure that a merge field in the link works reliably, assign it using the Link function in the editor:
Select the desired link text (e.g.
{Responsible.FirstName} {Responsible.LastName}).Click on the link symbol.
Insert the merge field
{Responsible.CalendarMarketingLink__c}as a URL.Save your changes.
 X
X
Note: Any warning messages in the editor due to a missing URL can be ignored in this case, as the template will be processed correctly when sent. However, we always recommend sending a test message afterwards.
3.3. Wrappers
Wrappers are used to "wrap" information around your email. You can use wrappers at mailbox level or at template level. You can create a wrapper by clicking on the "New" button at the top right of the "Wrapper" tab.
 X
X
An interface for creating a "wrapper" data set opens. Fill in the following fields for the configuration:
| Field | Mandatory | Description |
|---|---|---|
| Name | Mandatory field | Customised, freely selectable name of the wrapper. |
| Type | Mandatory field | Here you can choose between "HTML" and "Mixed". The difference is that with "Mixed" line breaks are also interpreted and with "HTML" a "br"-Tag must be used for this. |
| Parent | Optional | You could define a "parent" wrapper here. This would allow you to display a wrapper within another wrapper. |
| Language | Optional | Here you can select the language in which the wrapper is written (important for the translation function). |
| Subject | Optional | The character string that the wrapper should "wrap" around the subject of the email is saved here. You cannot use HTML tags here as these are not interpreted. |
| Body | Optional | Here you can write your text either in pure HTML or mixed, depending on the "Type" selected. |
For example, you can use a wrapper at mailbox level to create a signature or you can use a wrapper at template level to market more of your products.
3.3.1. Example
We now want to add the out.bounz logo to the emails that are sent via the "Reminder" button. To do this, we create a wrapper so that the logo is displayed below the email message.
To do this, we go to the "Wrappers" tab and click on "New"
Here we enter the following information:
Name: out.bounz
Type: HTML
Body:
{body}
<body style="margin:0;padding:0;">
<table cellpadding="0" cellspacing="0" border="0" style="border-collapse:collapse;">
<tr>
<td style="padding:0;">
<img src="https://10a725d12a.imgdist.com/pub/bfra/2nq7sjwo/aer/i3x/koy/out.bounz.png" style="display:block;width:100%;">
</td>
</tr>
</table>
</body>
 X
X
Now we need to link the wrapper to the template. To do this, we go to the "Templates" tab and select the "Reminder" template. We now enter "out.bounz" under "Wrapper".
 X
X
If we now press the "Reminder" button at lead level, we can see the out.bounz logo under our email.
 X
X
3.4. Schedules
Schedules can be used to plan automatic email sending. You can create a schedule by clicking on the "New" button at the top right of the "Schedules" tab.
 X
X
An interface for creating a "Schedule" data record opens. Fill out the following fields for the configuration:
| Field | Mandatory | Description |
|---|---|---|
| Name | Mandatory field | Your own, freely selectable name of the template. |
| Template | Mandatory field | Here you must select the template to be sent. |
| User | Optional | Here you can specify the user from which the schedule should be sent. The configuration of the "Sender" in the template will be overwritten. |
| Mailbox | Optional | Here you can define a filter keyword to use the correct mailbox if you have defined multiple addresses. For example, entering "gmail" will filter for the respective Gmail address. |
| Earliest Time | Optional | Here you select the earliest time from which emails should be sent by the Schedule. |
| Latest Time | Optional | Here you select the latest time from which emails should be sent by the schedule. |
After creating the "Schedule" data set, you can view the open and click rates of the email within your schedule if you have activated notifications.
You can also define filter blocks by clicking on the "New" button in the "Filter Blocks" list. This allows you to filter which condition must apply to the primary scope of the template for the email to be sent.
At the top right of the Schedules page you can find the following buttons:
Edit: Allows you to edit the page.
Delete: Allows you to delete the entire template.
Clone: Allows you to duplicate the template.
Preview: Allows you to see which Salesforce objects the Schedule would send emails to when it is activated.
Activate: Allows you to activate the schedule (Note: the schedules must first be activated in the configuration record).
Activities: Here you can view the click and open rates of your schedule and see who has received the schedule.
Schedules are checked every 5 minutes. So if you start your schedule at 10:12 am, it will be sent at 10:15 am.
Note: You can deactivate the schedule at any time by clicking on the "Deactivate" button. For editing fields of a schedule, it must first be deactivated.
Sending Emails with a Dynamic Sender
If you want to send emails via a schedule with a dynamic sender (e.g., based on a user or another assignment), keep the following in mind:
Leave the Mailbox field in the schedule blank, as merge fields are not supported there.
The email will automatically be sent from the mailbox available to the sender defined in the template (as long as the sender has a mailbox relation).
Note: The sender specified in the template must have a valid relation to a mailbox for the email to be sent successfully.
3.4.1. Filter Blocks
In the “Filter Blocks” section, you can define filters that control which recipients from the template's recipient list the email is sent to. By default, an email is sent to all entries defined as recipients (e.g., all leads). However, often an email should only be sent to certain entries from the recipient list (e.g., all open leads). These restrictions can be configured using filter blocks, which contain individual filters.
To create a filter block, click on “New.” Then select a logic that defines when the filter block allows an email to be sent. Here, you can choose between “All filters must be met” and “At least one filter must be met.” In the “Target Filters” area, you can now create individual filters that will be applied to all recipients when the schedule is executed. To create a filter, click on “Configure” in the top bar.
 X
X
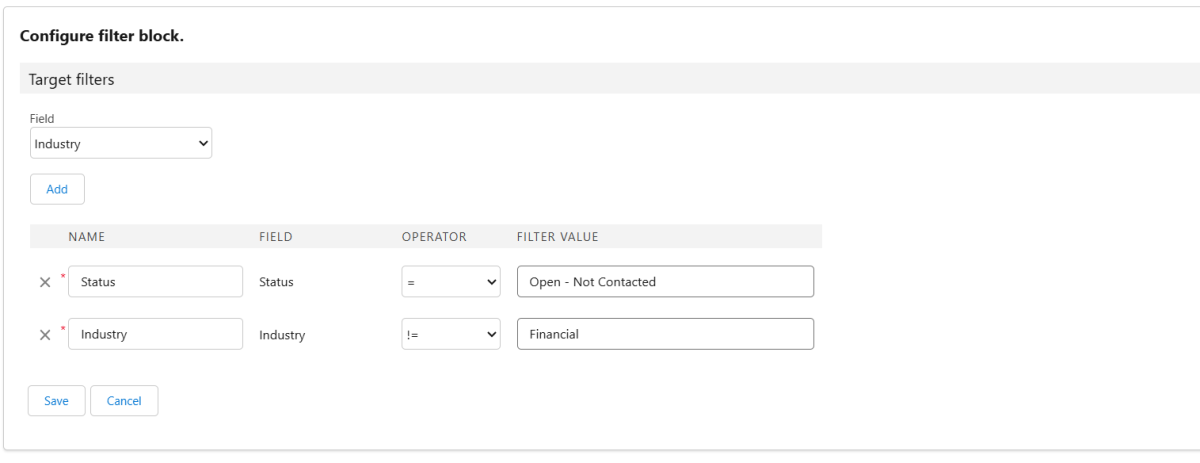
For the “Field,” you can now choose from all fields in your template's scopes. Then click “Add” to define the logic of the filter. Select a comparison operator under "Operator" and a comparison value under “Filter Value.” Then click Save to save the filters.
In the following example, we have created two filters that define that the associated email is only sent to leads with the status “Open - Not Contacted” and an industry other than “Finance.”
 X
X
Configuring a filter block for the opt-out function
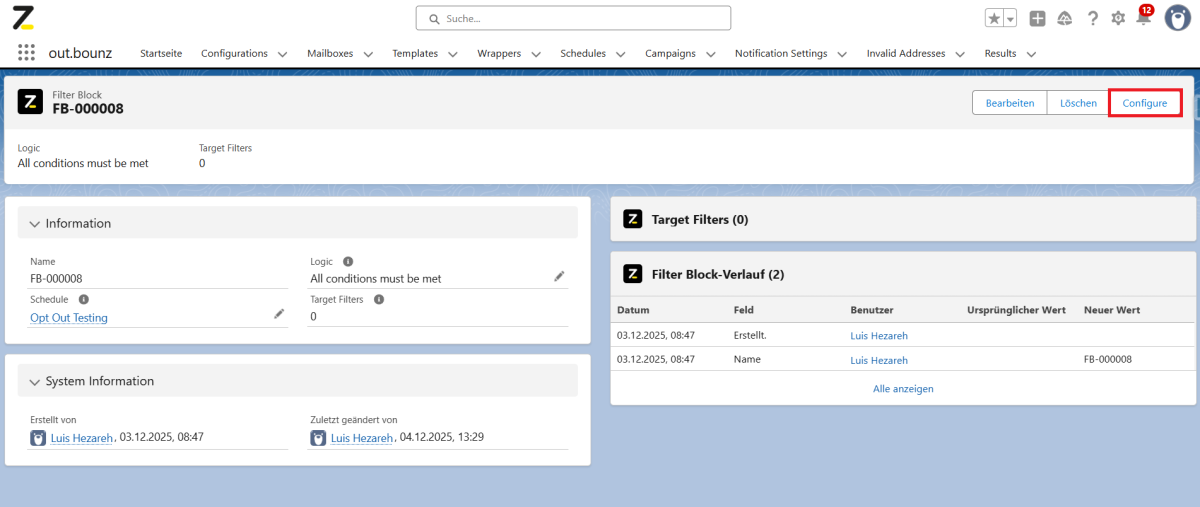
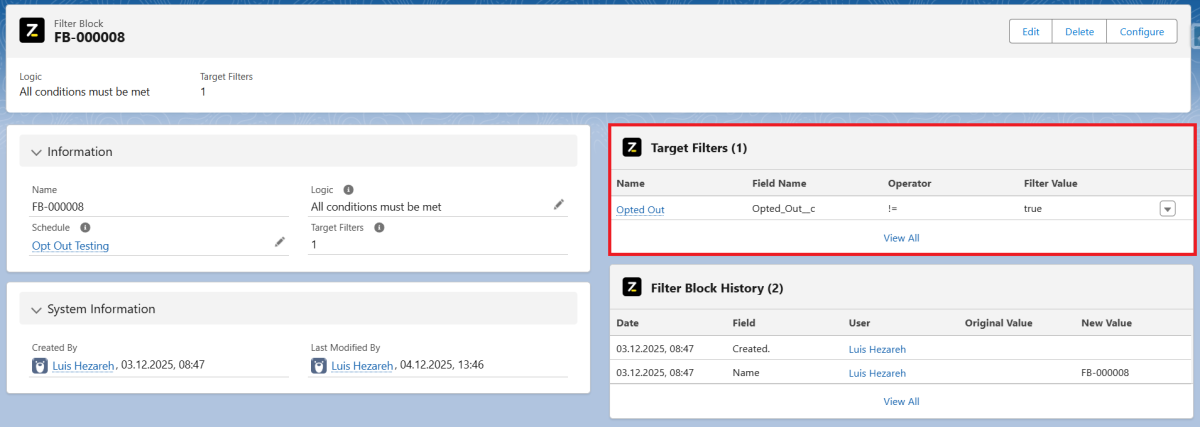
To ensure that the opt-out function, which has already been configured in the template, works correctly, we create a filter that prevents the email from being sent to recipients who have already activated “opt-out.”
To do this, we create the following filter block:
 X
X
To do this, we simply set up one filter with the following configurations:
Field: "Opted_Out__c" (= the custom field used for Opt-Out)
Operator: !=
Filter Value: true
If a recipient has used the opt-out-functionality (= the "Opt_Out__c" checkbox is set to true), they will not receive any emails from this schedule.
Note: This filter block must be defined for all schedules that use templates that utilize the opt-out function.
3.4.2. Example
We want to send a friendly greeting to all new leads in our organisation. After the email has been sent, the status of the leads should then be changed from "Open - Not Contacted" to "Working - Contacted". We create a schedule for this.
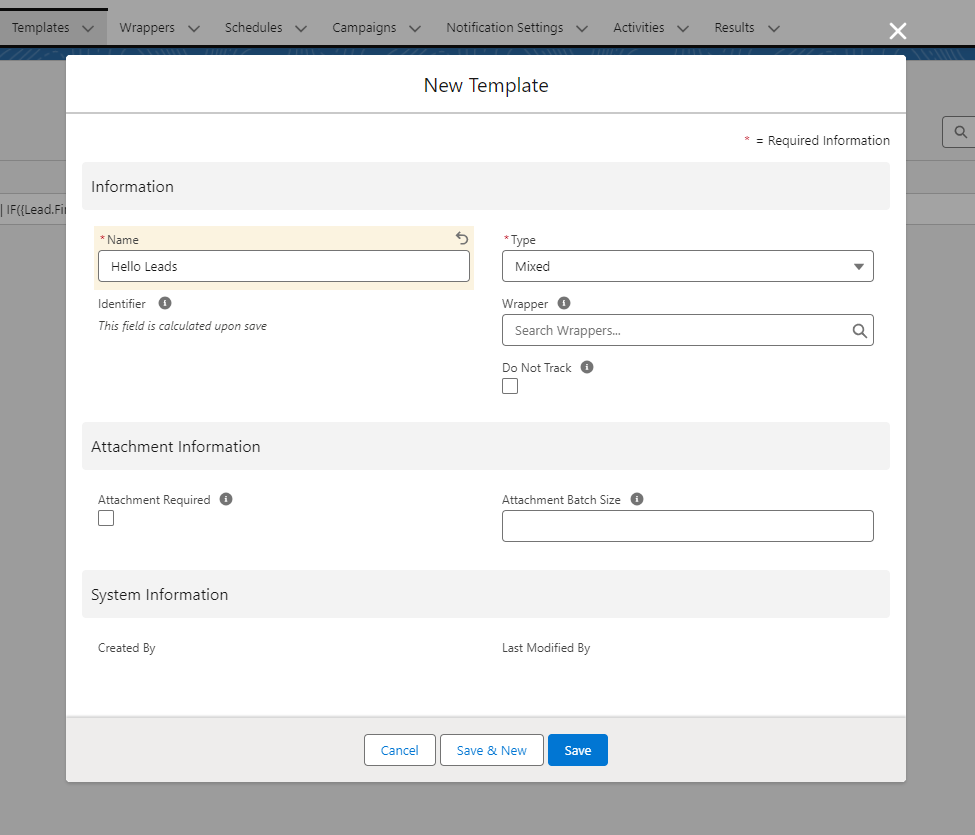
Firstly, we need to create a suitable email template. To do this, we go to the "Template" tab and click on "New". We create the following template:
Name: Hello Leads
Type: Mixed
 X
X
Next, we need to create a Primary Scope to determine which objects we want to send the email to. In this case, to leads.
To do this, we go to the "Create Primary Scope" button, search for "Lead", tick the checkbox and click on "Create".
 X
X
Now we want to set all our leads to receive their emails from the user who is the lead owner (all users who are lead owners should have an active mailbox for this to work properly).
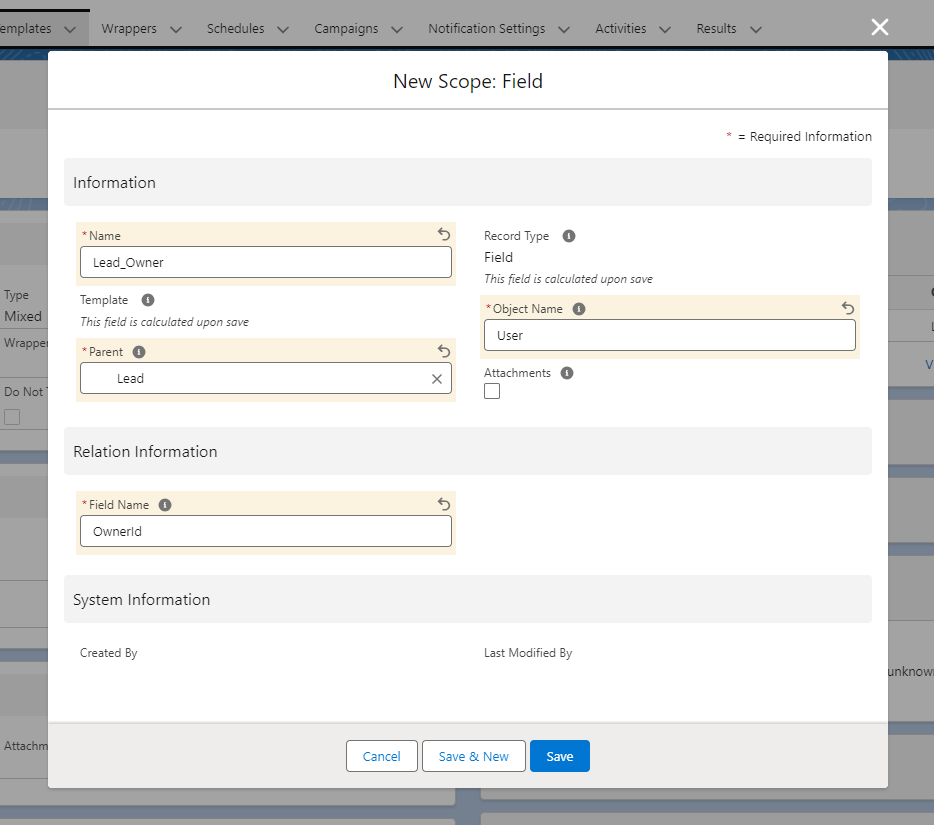
To do this, we first create a field scope, as we want to access the lead owner field within the lead. The field scope has the following information:
Name: Lead_Owner
Object Name: User
Parent: Lead (name of the primary scope)
Field Name: OwnerId
 X
X
Now we need to add the lead owners as dynamic transmitters. We create a new sender, click on "Dynamic" and then enter the following information:
Name: Lead Owner
Scope: Lead_Owner
Template: Hello Leads
 X
X
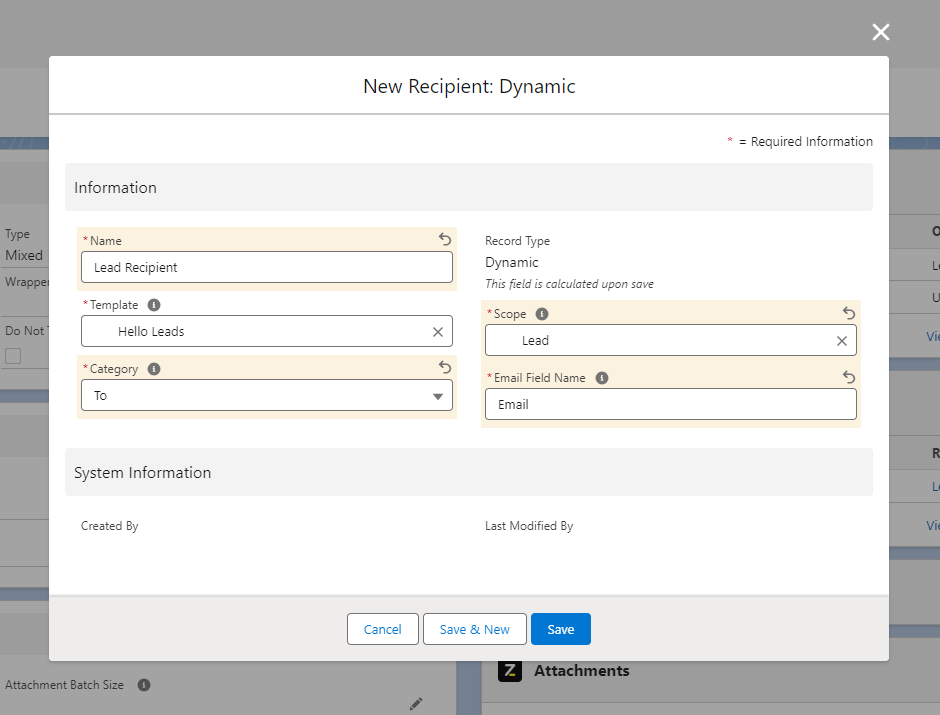
Next, we create a recipient. We could create a lead recipient, but we choose a dynamic recipient because we want to send the schedule to multiple leads. We create the following dynamic recipient:
Name: Lead Recipient
Scope: Lead
Template: Hello World
Category: To
Email Field Name: Email
 X
X
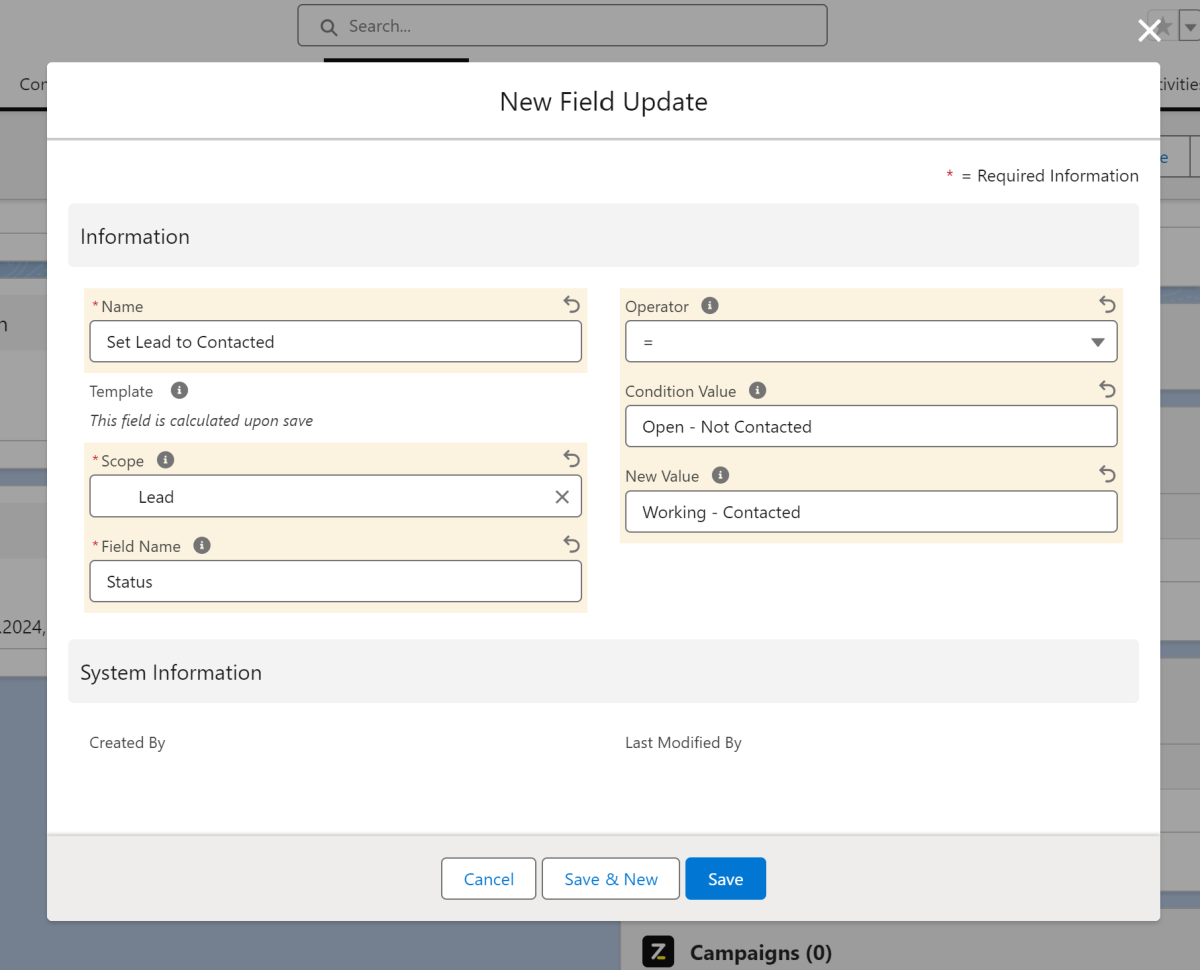
As we want to change the status of the lead from "Open - Not Contacted" to "Working - Contacted" after sending the email, we need to create a "Field Update". We create a field update by clicking on the "New" button in the "Field Updates" data record. We then enter the following information:
Name: Set Lead to Contacted
Template: Hello Leads
Scope: Lead
Field Name: Status
Operator: "="
Condition Value: Open - Not Contacted
New Value: Working - ContactedEmail
 X
X
Now we can fill the email with content. To do this, we enter the following information:
Subject:
Ein freundliches Hallo von {Lead_Owner.Name}
Body:
Hallo {Lead.Name} von {Lead.Company}, Ich möchte Sie herzlichst begrüßen und mit Ihnen in Kontakt treten. Mit freundlichen Grüßen,{Lead_Owner.Name}
We have now successfully created our template. This could already be used to send emails via a button. However, our example is about creating a schedule. We therefore need to create a schedule in the next step and fill it with the following information:
Name: Hello Leads
Template: Hello Leads
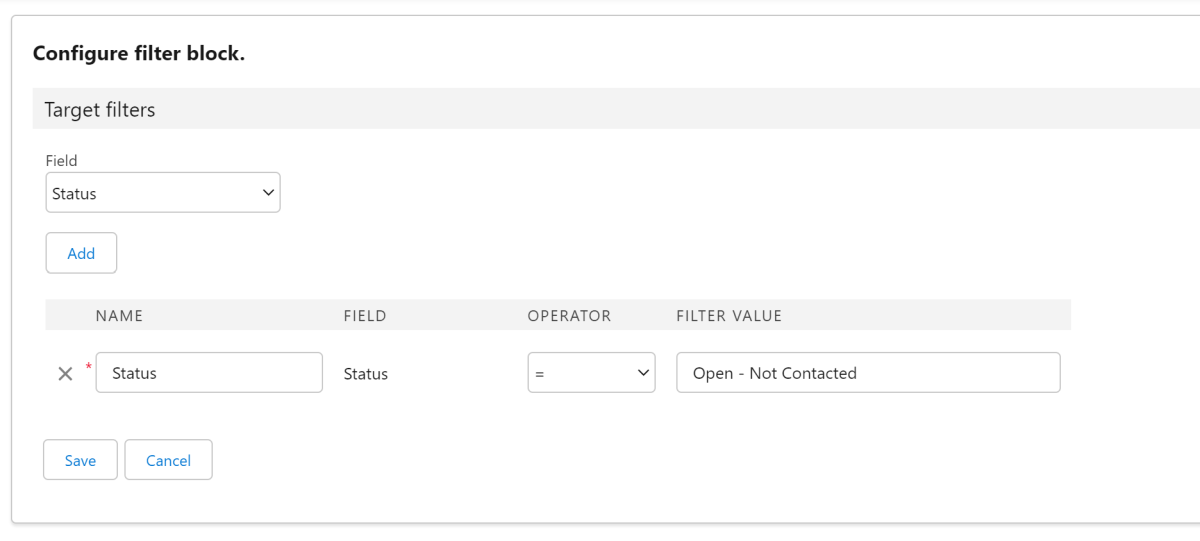
We then need to create a "filter block" to filter which leads the schedule should be sent to. We create a filter block by clicking on the "New" button in the "Filter Blocks" data record. In the "Logic" field, we enter "All conditions must be met". Now we click on the "Configure" button in the filter block. Here we search for "Status" under "Field" and click on "Add". We enter the following information:
Name: Status
Operator: "="
Filter Value: Open - Not Contacted
 X
X
We have thus filtered so that the schedule is only sent to leads whose current status is "Open - Not Contacted". By clicking on the "Preview" button in the Schedules data record, we can now see which leads have this status and thus would receive the email.
Finally, we activate the schedule using the "Activate" button and the schedule is sent to all new leads in your organisation.
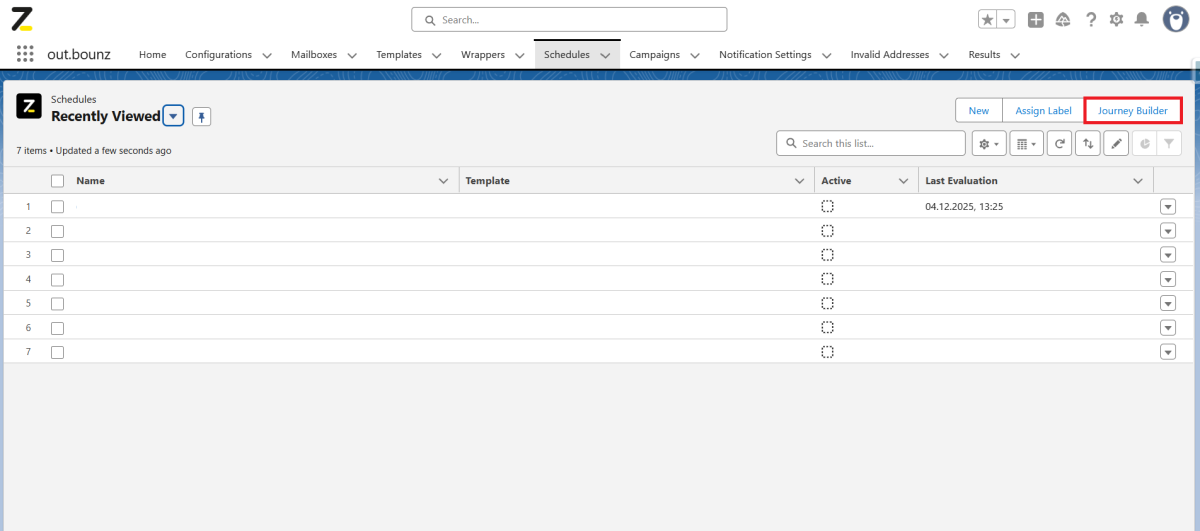
3.5. Journey Builder
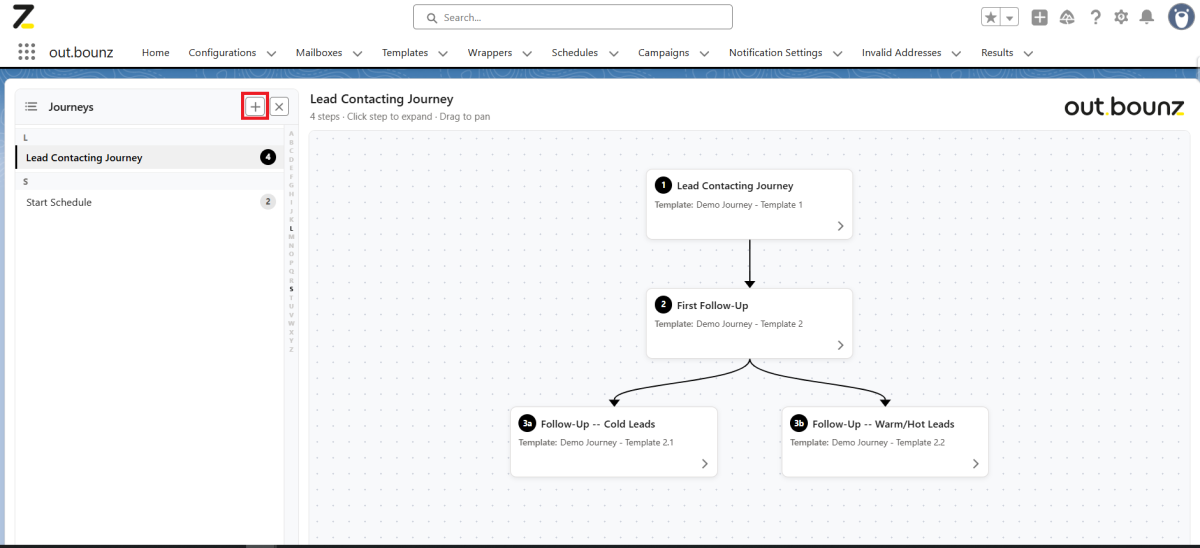
With out.bounz’s Journey Builder, you can easily map out and implement complex journey structures. A journey in out.bounz consists of several schedules, which can be linked together and made interdependent using filter blocks. To open the Journey Builder, click the button in the top-right corner of the ‘Schedules’ section.
 X
X
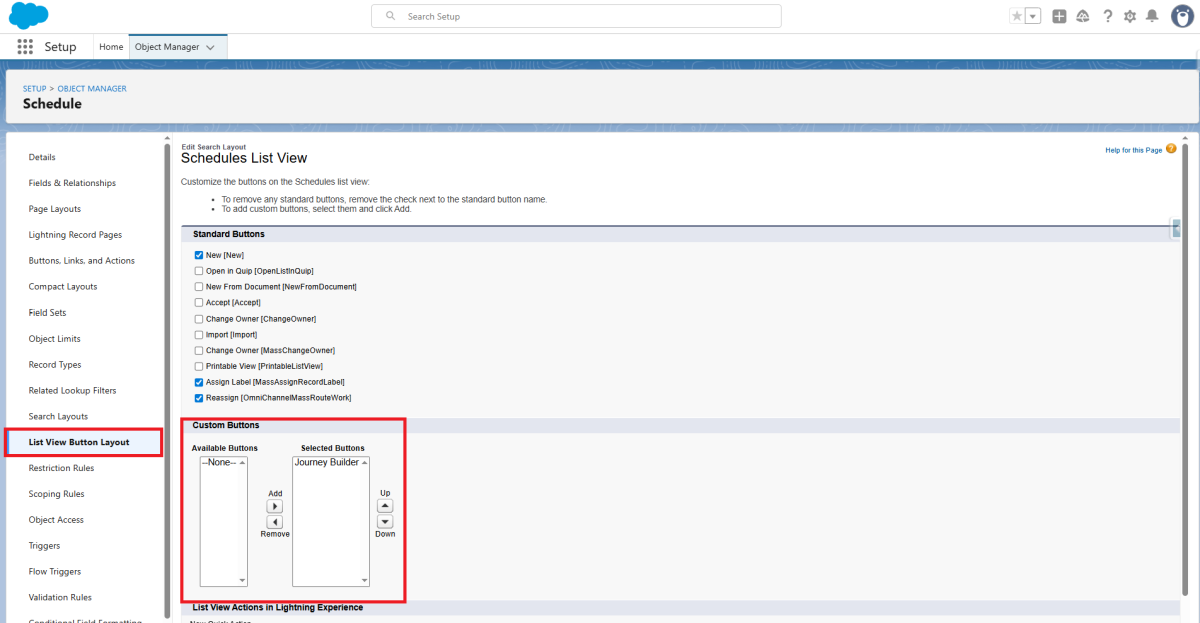
Note: If you installed out.bounz before May 7, 2026, you will need to display it manually. To do this, go to the Object Manager in Setup, select the Schedule object (outbounz2__Schedule__c), and enable the ‘Journey Builder’ button in the ‘List View Button Layout’ section under Custom Buttons.
 X
X
After clicking, the Journey Builder interface will open. On the left side, you will see an overview of your existing journeys. If you haven’t created a journey yet, or if you want to create a new one, click on ➕ above the journey list. To edit an existing journey, simply select the journey you want from the list, and it will open in the Journey Builder area.
 X
X
When creating a new journey, a window opens where you can assign a start schedule to the journey. Here, you can choose from existing schedules or create a new one. This schedule forms the basis of your journey and will be continued in the following steps. Once you have created or selected a schedule, click on Create/Link Schedule to create the journey.
Now, the starting point of your journey has been created. Your schedule will now appear on the interface, and you can further develop it into a journey. For this purpose, the following actions are available:
| Action | Description |
|---|---|
| Open Schedule Record | Opens the schedule record in a new window. |
| Add a Step | Adds another step (schedule) to the journey below the current schedule. |
| Activate | Activates the selected schedule. |
| Delete | Deletes the selected schedule. For journeys, it is only possible to delete schedules that do not have any subsequent schedules. |
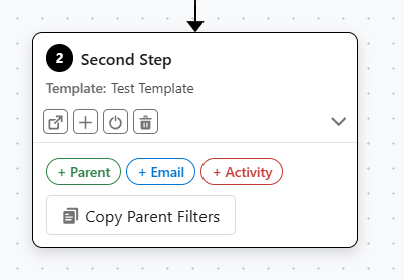
3.5.1. Filter Blocks
As with standard schedules, you can use filter blocks to define the recipients of the email in question. However, there are special filters for journeys, which are explained below.
There are essentially three types of filter blocks for journeys:
- Parent (default filter block which refers to the template’s primary scope)
- Email (refers to the email sent by the previous schedule)
- Activity (refers to the activity and tracking data for the email from the previous schedule)
To create a new filter block, click on the button for the respective filter block type you want to use. To simplify segmentation, you can also click the Copy Parent Filters button to directly apply the filters from the previous schedule.
 X
X
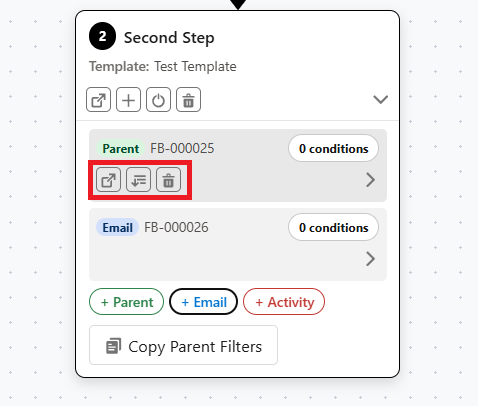
To define individual filters within a filter block, click Open Filter Block in the relevant filter block to open the entire filter block, or click Configure Filter Block to define individual filter criteria directly. The configuration of the individual filters is exactly the same as for the filters of a single schedule. To delete a filter block and all its filters, click Delete filter block.
 X
X
3.6. Campaigns
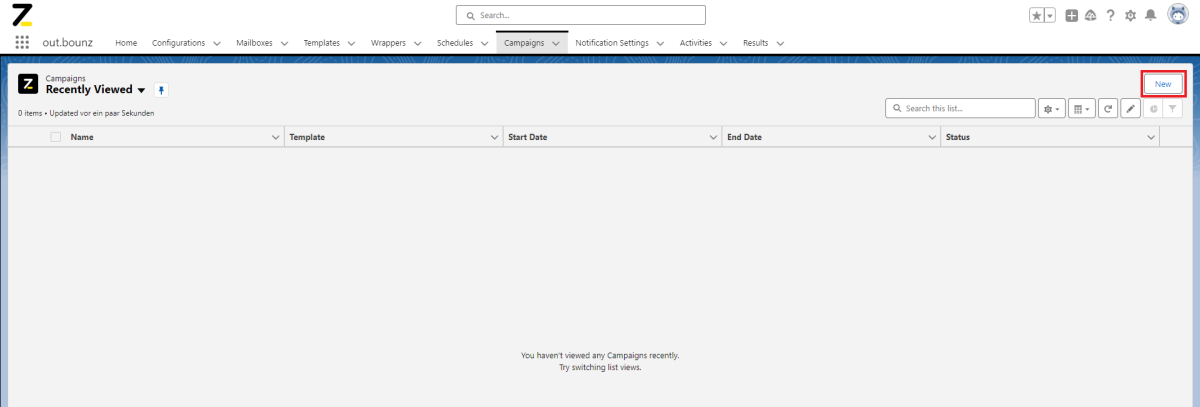
Campaigns are used to send an email to one or more objects at a predetermined time. The difference to schedules is that campaigns are only executed once at a time specified by you. You can create a campaign by clicking on the "New" button at the top right of the "Campaigns" tab.
 X
X
An interface for creating a "Campaign" data record opens. Fill in the following fields for the configuration:
| Field | Mandatory | Description |
|---|---|---|
| Name | Mandatory field | Own, freely selectable name for the campaign. |
| Template | Mandatory field | Here you must select the template to be sent. |
| User | Optional | Here you can specify the user from which the campaign should be sent. The configuration of the "Sender" in the template will be overwritten. |
| Mailbox | Optional | Here you can define a filter keyword to use the correct mailbox if you have defined multiple addresses. For example, entering "gmail" will filter for the respective Gmail address. |
| Date | Optional | Date on which the campaign is to be sent. |
| Time | Optional | Time at which the campaign is to be sent. |
After creating the "Campaign" data set, you can see the open and click rates of the email within your campaign if you have activated notifications.
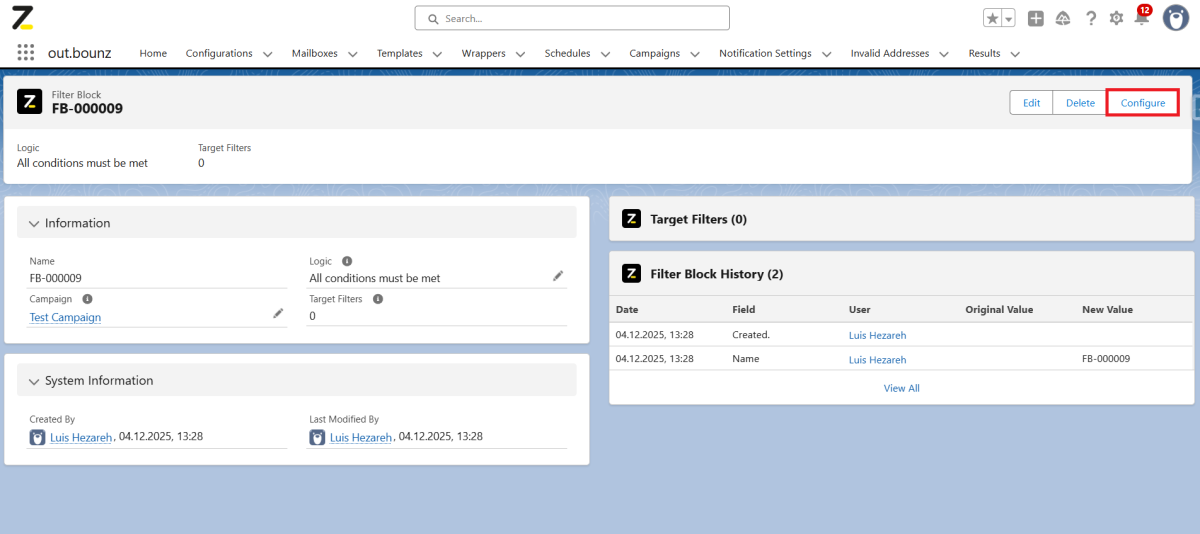
You can also define filter blocks by clicking on the "New" button in the "Filter Blocks" record. This allows you to filter which conditions must be met for the campaign to be sent.
At the top right of the Campaign page you can find the following buttons:
Edit: Allows you to edit the page.
Delete: Allows you to delete the entire campaign.
Clone: Allows you to duplicate the campaign.
Preview: Allows you to see who the campaign will be sent to.
Start: Allows you to start the campaign.
Activities: Here you can view the click and open rates of your schedule and see who has received the schedule.
Campaigns are checked every 5 minutes. So if you start your campaign at 10:12 am, it will effectively start at 10:15 am.
You can stop your campaign after it has started by clicking on the "Abort" button.
 X
X
3.6.1. Filter Blocks
In the “Filter Blocks” section, you can define filters that control which recipients from the template's recipient list the email is sent to. By default, an email is sent to all entries defined as recipients (e.g., all leads). However, often an email should only be sent to certain entries from the recipient list (e.g., all open leads). These restrictions can be configured using filter blocks, which contain individual filters.
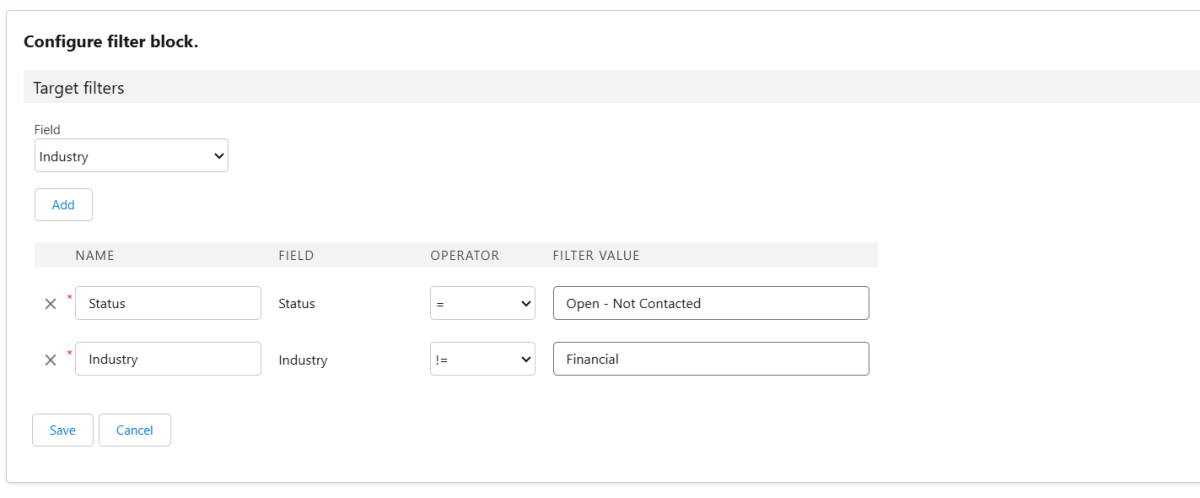
To create a filter block, click on “New.” Then select a logic that defines when the filter block allows an email to be sent. Here, you can choose between “All filters must be met” and “At least one filter must be met.” In the “Target Filters” area, you can now create individual filters that will be applied to all recipients when the campaign is executed. To create a filter, click on “Configure” in the top bar.
 X
X
For the “Field,” you can now choose from all fields in your template's scopes. Then click “Add” to define the logic of the filter. Select a comparison operator under "Operator" and a comparison value under “Filter Value.” Then click Save to save the filters.
In the following example, we have created two filters that define that the associated email is only sent to leads with the status “Open - Not Contacted” and an industry other than “Finance.”
 X
X
Configuring a filter block for the opt-out function
To ensure that the opt-out function, which has already been configured in the template, works correctly, we create a filter that prevents the email from being sent to recipients who have already activated “opt-out.”
To do this, we create the following filter block:
 X
X
To do this, we simply set up one filter with the following configurations:
Field: "OptedOut_c" (= the custom field used for Opt-Out)
Operator: !=
Filter Value: true
If a recipient has used the opt-out-functionality (= the "OptOut_c" checkbox is set to true), they will not receive any emails from this campaign.
Note: This filter block must be defined for all campaigns that use templates that utilize the opt-out function.
3.6.2. Example
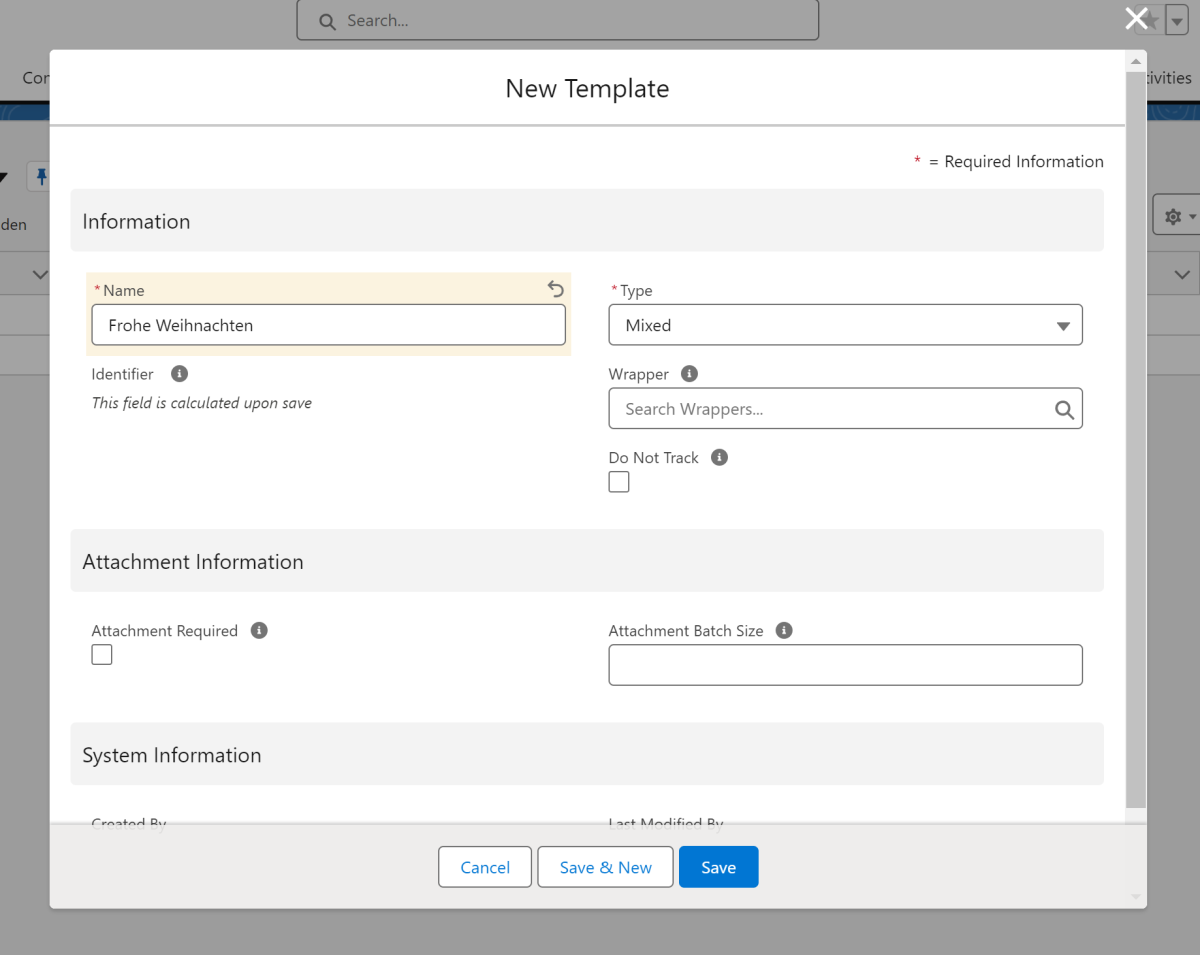
For Christmas, we want to send an email to all leads in our organisation wishing them a Merry Christmas. However, our leads come from different countries and therefore speak different languages. To make the email more personalised, we want it to arrive in the recipient's preferred language. We create a campaign for this purpose.
Firstly, we need to create a suitable email template. To do this, we go to the "Template" tab and click on "New". We create the following template:
Name: Merry Christmas
Type: Mixed
 X
X
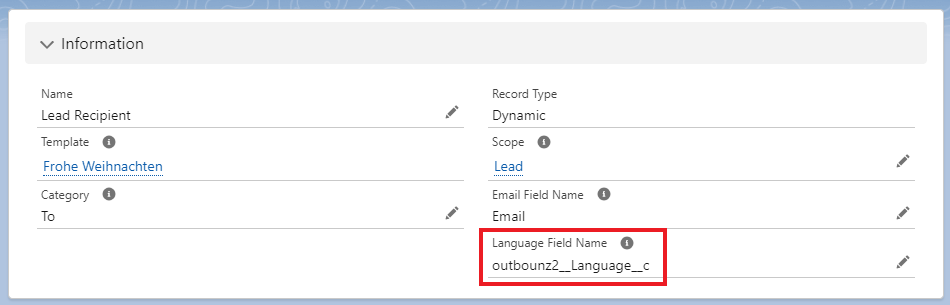
We create Primary Scope, Field Scope and Sender as in the example case described above for Schedules. For Recipients, we must also specify the "Language Field Name" field here. Here we enter "outbounz2__language__c".
Note: The "Language" field must first be displayed at lead level.
 X
X
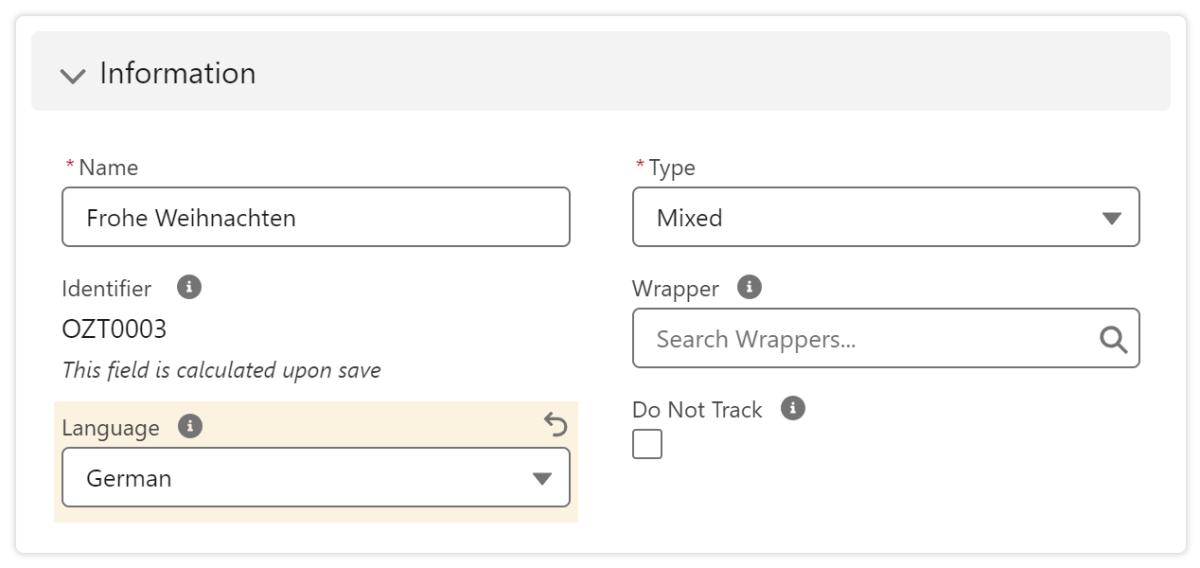
As we want to use the translation function here, we also need to adjust the "Language" field at template level. As we want to write the template in German, we select "German" here.
 X
X
Now we can fill the email with content. To do this, we enter the following information:
Subject:
Frohe Weihnachten und die besten Wünsche für das neue Jahr!
Body:
Hallo [[{Lead.Name}]], Ich hoffe, diese Nachricht erreicht Sie in bester Gesundheit und guter Stimmung. Ich möchte diese Gelegenheit nutzen, um Ihnen und Ihren Lieben ein frohes Weihnachtsfest zu wünschen! Mögen diese Feiertage mit Liebe, Freude und Frieden erfüllt sein, während Sie kostbare Momente im Kreise Ihrer Familie und Freunde genießen. Frohe Weihnachten und ein gesegnetes neues Jahr!
Mit herzlichen Grüßen, [[{Lead_Owner.Name}]]
We put the merge fields in two square brackets, as this prevents them from being translated unintentionally.
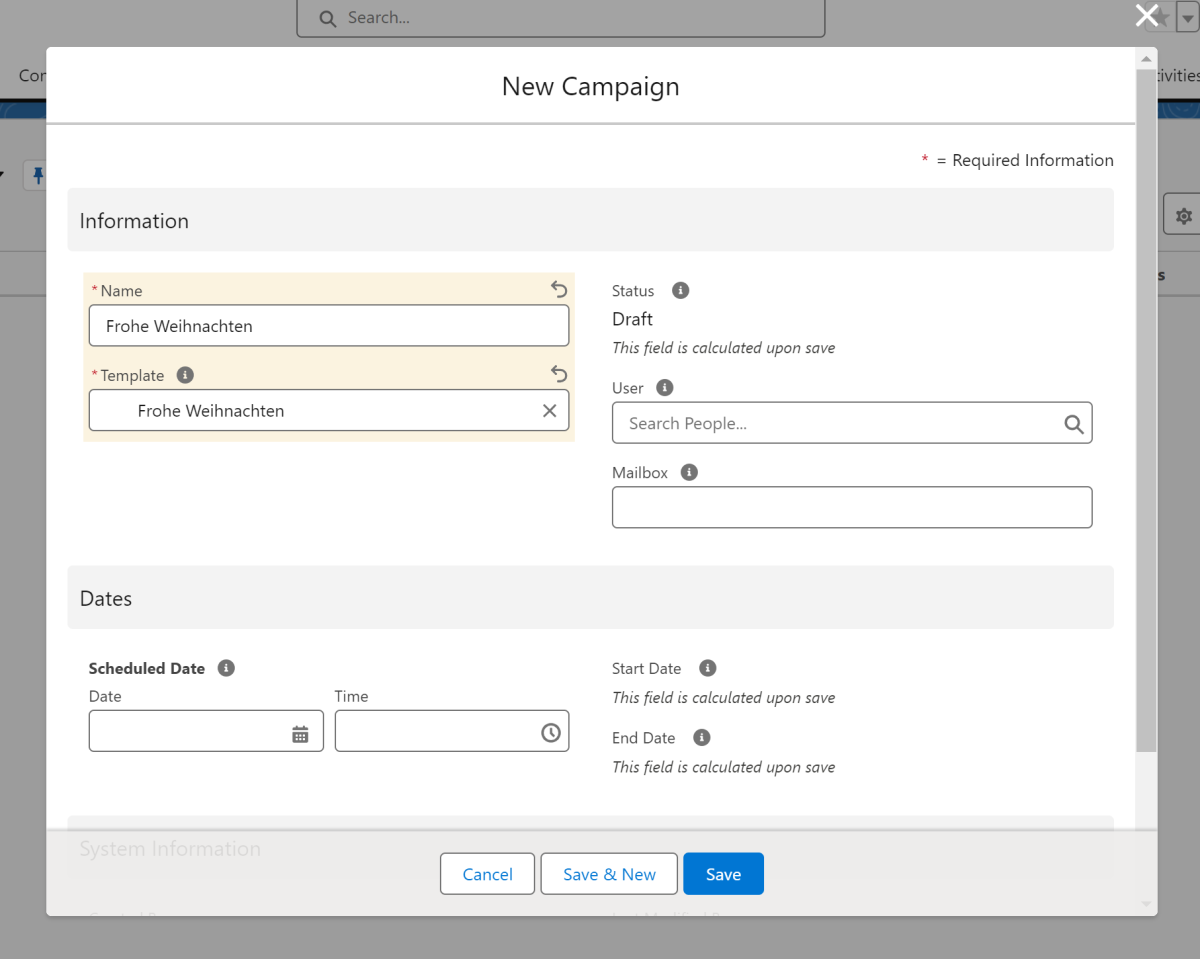
We have now successfully created our template. This could already be used to send emails via a button. However, our example is about creating a campaign. We therefore need to create a campaign in the next step and fill it with the following information:
Name: Merry Christmas
Template: Merry Christmas
 X
X
We are now ready to start the campaign. We click on the "Start" button and enter the current time.
 X
X
Click on the "Confirm" button to start the campaign.
3.7. Notification Settings
With notification settings, you can set whether and when you want to be notified when a recipient opens the email you have sent. You can set this by clicking on the "New" button in the "Notification Settings" tab.
Here you have the option of activating notifications for emails sent by a specific user. For example, if an employee sends an email from your user, you will be notified of the opening and not your employee. On the other hand, you can activate the notifications for emails sent from a specific template with a specific user. This allows you to be notified only for certain emails that are sent via your user instead of all emails.
You can also choose whether the notification setting is active and whether you only want to be notified when the email is opened for the first time or every time it is opened. You can also set whether every opening should be counted as an opening or only the first one.
You will then see the notification at the top right of the bell and in the "Activities" tab.
3.7.1. Example
We want to be notified when a lead has opened the email we sent via the "Reminder" button.
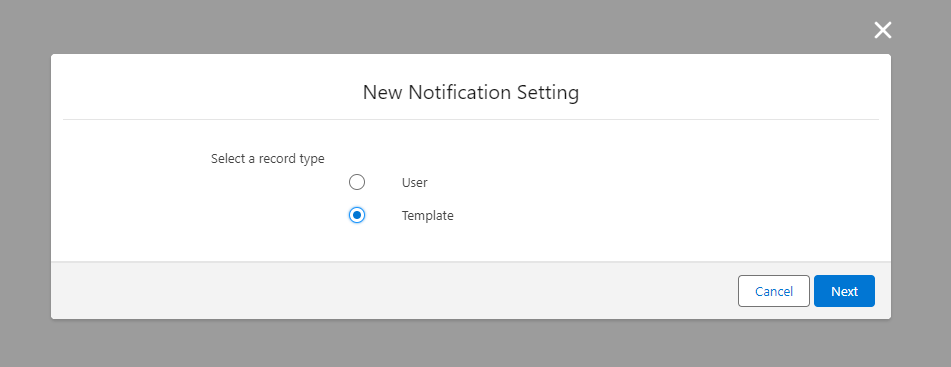
To do this, we go to the "Notification Settings" tab and click on "New".
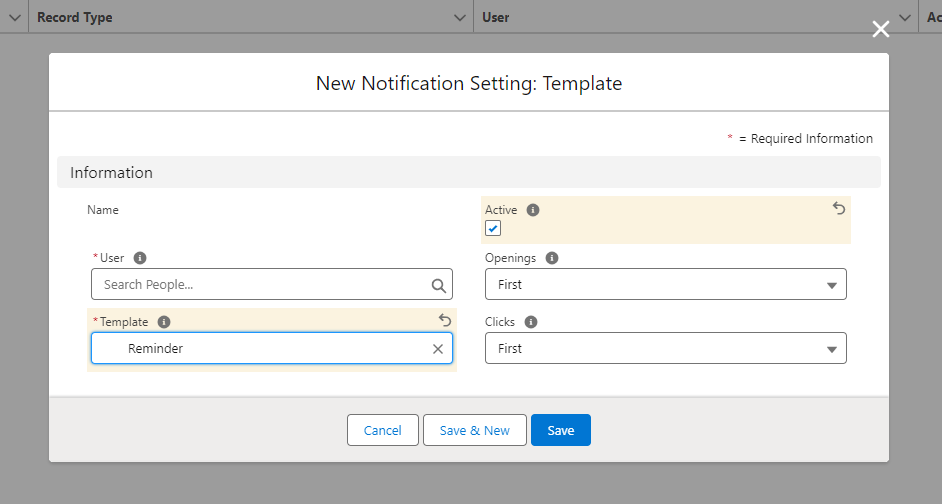
We select "Template" as the record type.
 X
X
Here we enter the user, select the "Reminder" template and activate the notifications by clicking in the "Active" field.
 X
X
When the lead opens the email, we receive a notification via the bell next to the profile.
 X
X
We can also see when the email was opened in the "Activities" tab.
3.8. Invalid Addresses
The “Invalid Addresses” section displays mail addresses to which at least one email could not be successfully delivered.
As long as an email address is stored here, no more emails will be sent to this address from active schedules/campaigns. Also, out.bounz only stores a maximum number of 1000 addresses at once. We therefore recommend checking this section regularly for entries.
An entry here has the following fields:
| Field | Description |
|---|---|
| Name | Here you can see the name that is associated with the mail address |
| Here you can see the mail address that is associated with the error | |
| Parent | Here you can see the parent object from which the mail that triggered the error was sent |
Note: The parent object from which the mail was sent is not necessarily the object that contains the incorrect mail address. If you can't find the mail address directly (as a field in the parent object), search for the address in the child scopes based on your scope structure.
4. Error Handling
The more diverse the functionality of a system, the more complex the configuration. Errors happen in the process. A central focus of out.bounz is to support users in analysing configuration errors as best as possible and to avoid input errors directly.
Should you nevertheless encounter an unknown error message, simply send a screenshot to support@outbounz.com and we will help you.
4.1. Data entry error
If errors occur due to incorrect entries or connection problems, the user receives a corresponding message.
If no error message is displayed, it can generally be assumed that the triggered action was successful.
Some of the error messages displayed originate from connected third-party systems, the out.bounz application or Salesforce itself.
If an error message is unclear, we recommend consulting the Salesforce administrator responsible for the installation. If they are also unable to help, simply send an email to support@outbounz.com with a screenshot of the error message so that we can help you directly.
4.2. Error with actions executed in the background
For a better overview, most of the actions performed in the background are saved in a "Result" object set up for this purpose. This makes it possible to trace actions carried out in the background or automatically.
A list of these result data records can be found in the "Results" tab. If successful, the message "Success" is displayed. In the event of an error, the corresponding error is displayed.
Note on releasing storage space: The "Clear" button can be used in any list view of the "Results" tab to release storage space that has been used up over time by accumulated "Result" data records. Please note that when using this button, all "Result" data records are always deleted regardless of the currently displayed list view!
4.3. Unexpected Addition of Email Addresses to the "To" Field
When sending emails through out.bounz in Salesforce, email addresses in the "CC" or "BCC" fields may unexpectedly appear in the "To" field. This occurs if a Salesforce contact shares the same email address as the user added in "CC" or "BCC."
Solutions:
Remove or modify the email address in the relevant Salesforce contact.
Use SMTP for email delivery to bypass this behavior.
5. Glossar
Objects
Record types within the Salesforce database. Examples of standard objects that are already created in Salesforce are accounts, contacts and opportunities. In addition to the standard objects in Salesforce, any custom objects can be configured in Salesforce.
App Launcher
The App Launcher in the Salesforce org allows users to switch between different applications. The App Launcher displays tiles that are linked to the available Salesforce applications, the connected applications (third-party apps) and the user's local applications.
Authorization sets
A collection of authorizations to extend the access authorizations granted to users at profile level.
App password
An app password is a 16-digit security code that apps or devices can use to access your Google Account. App passwords can only be used for accounts that have two-step verification enabled.
Formula field
A field that cannot be edited.